Travel_agencies_Manual
- Pablo Cappelletto (Deactivated)
General information
Emulator information display
This command functionality is to display your device or terminal features.With this command you will display the following information. Device ID, city and airline,displayed window,assigned user and work duty,local time ,UTC. The device has up to 3 windows or screens that are work areas which can be used independently one or the another allowing the user to sign in to the necessary ones and perform different duties in the system without ignoring or modifying what is done on the other work areas.
Device Emulator description
The device emulator is the pseudo city that identifies an office and its terminal.
Description
| City | Type | Identifier | Sub-Type | Terminal Address |
|---|---|---|---|---|
| BUE | A | 123 | 0 | 98 |
Sign in/Log in
Your Signature or User ID is your identification to KIU System and it also controls what you can or cannot perform in the system. You also need to type a password which consists of 7 to 8 alphanumeric characters .
Description
System prompts to sign into the system with your User ID and password in a sign in mask.
| SI | Fixed command |
| 4051 | User ID |
System Response
Current Password:******* ID: 010000
Duty Code . New Password: *********
You must type your password in the sign in mask
If you wish to change your password you type your personal ID,then your current password the you type ENTER then you hit TAB until New Password box you type the new password and hit Enter.
When you sign into the system you access with the highest Duty Code.If you need to change to another duty code you have to tab and type the desired one in the duty code box.
System Response
AEP.AEP-PC |
|---|
AEP.AEP-PC City and User Initials |
|---|
Password Guidelines
1) After 5 fail attempts to sign into the system you password gets blocked.
2) After 10 fail attempts to sign into the system your terminal gets blocked.
3) You must change you Password every 165 day.
4) One week before the deadline you will get a prompt to change your password. Once the password expires you will need to change it as described above-
5) You cannot reuse you last password.
Work Areas Display
Kiu system has 3 cryptic work areas identified as 1,2 and 3 ,and 10 graphical ones .Entries made in one work area do not affect the work you do in the other areas.
When you sign into the system you always access Area 1. If you want to change area your use change sign ø and the desired work area
Command
| ø2 |
|---|
Description
ø Change Sign 2 Work Area number |
|---|
You can also open a new work area clicking you mouse over the upper menu on the MAIN option and then NEW AREA.
To go to another area you type Ø+ new number area. or by hitting CONTROL+TAB
If you want to display status all your current work areas you type
| *S |
|---|
*S AGT CITY DUTY QUEUE PNR STATUS NAME |
.
This response describes work areas, the agent signature and the city assigned. In case the agent is working on queues the system response describes which ones. If the agent is working on a PNR system will indicate the duty performed and the PNR name.
DISPLAY
CREATE
MODIFY,
- * sign placed before the area indicates the are where you are placed.
- PNR indicated the work areas that are active.
Device Timeout
After 15 minutes of inactivity the device will be disconnected turning the screen color into green. (See Standard configuration in the Device Configuration Manual).
To reconnect you have to press the telephone icon placed on the upper left upper bar.Once clicked you will return to activity immediately.
.
Sign out/log out
In order to sign out of KIU System you need to perform any of these entries.
SO Sign out of the current work area. SO* Sign out of all work areas. |
|---|
- In case you are working on a PNR in one of the work area system will warn the user with the following message.
PNR PRESENT - FINISH OR IGNORE
- This warning indicates that you must either Ignore o Finish your PNR before being able to sign out and perform the same command again.
Screen Clear
In order to clear you screen you can type CLS command or by hitting CONTROL+BACKSPACE without losing any information previously entered.The cursor is returned to the upper left side corner of the screen
Time display and calculations
Display local work area time where agent is assigned.
T*
Response:
AEP: 15 JUN 2018 11:21:07
Display local time in the specified city (eg. JNB)
T*JNB
Response:
JNB: 15 JUN 2018 16:21:39 [ZA]
Display GMT or Zulu time
T*GMT
Response:
GMT TIME: 30 JUN 2018 15:28:26
GMT to local time conversion
T*AEP/1200
Response:
GMT TIME FOR AEP/1200: 30 JUN 2004 15:00:00
Time difference between a pair of cities
T*ET/BUE/LIM
Response:
TIME DIFFERENCE BETWEEN BUE/LIM (hh:mm): 02:00
Calculate distance between two cities in miles.
T*DM/BUE/LIM
Response:
1954 MILE
Calculate distance between two cities in air kilometers
T*DK/BUE/LIM
Response:
3145 KM
Calculate a specified date from a date.
TØ17JUL+5
Response:
DATE: 22JUL2018
Calculate the amount of days between two dates.
TØ17JUL-20AUG
Response:
DAYS: 34
Currency Conversion information
Currency Conversion Command
CU*CUR
System Response
Display a list of countries currencies with their corresponding ISO alpha and numeric code and country name.
| COD.ALF | IATA ISO Currency Code |
| COD.NUM | Numeric currency code |
| DECIMAL | Decimal amounts |
| FA ROUNDING | Fare amount rounding |
| NAME | Currency name |
| COUNTRY | Currency country. |
CU*ARS
Today´s date specific currency conversion to bankers selling rate (BSR).
Response
BSR 12SEP2017 => USD 1 = ARS 17.40000
CU*ARS100/USD
CU*ARS100/USD
Specific amount conversion from one currency to another.
Response
ARS 100.00 = USD 5.75 -- BSR 12SEP
CU*ARGENTINA
Country name currency encoding and conversion to BSR.
Response
CURRENCY FOR ARGENTINA : ARS
BSR 12SEP => USD 1 = ARS 17.4
Change command
Change command is configured in the TAB key.It is also identified in the system as [ square brackets.Such command will be used to modify parameters which are described in KIU RESERVATIONS MANUAL.
It can be changed to another key that does not interfere with KIU RES usage, so as to type this key to have ø key in KIU RES.
In order to have this change key changed in KIU you have to go to KIU RES to tool, options and then applications.
In application look or Key for Change and change any key that you will not use for KIU.
Test Mode
TEST mode allows you to work in the form of a test, emulating the database recorded in the system, without altering it in the REAL mode.Once signed in TEST, all commands that are executed will be on a virtual basis.
The command to sign in the TEST MODE command is as follows:
øøTEST o øøTSTS or øøTS
When you execute this command, the system opens a TEST window
To exit the TEST MODE, the command is:
øøEND o øøRES o øøLIVE
To view which Mode you are working in, the command is:
øø
The test mode is active while the device is active. When you close the device, the test mode is also closed.
Terminal Configuration
In this module the different features and configuration of KIU application will be described:
KIU Toolbar and screen
KIU screen is organized as follows:
1. Upper Toolbar : Application configuration
2. Main Screen: Work area
3. Bottom Toolbar : Terminal data is displayed
Below is a detailed description of how to configure and work in each of the areas that make up the KIU work screen.
Upper Toolbar Menu

In the top menu of the KIU system you can find the following icons from left to right:

Allows to reactivate the work screen when it is deactivated

Displays the last 30 commands made. They can also be retrieved using ALT and the arrows up or down the keyboard. Clicking on one of the commands in the list can repeat the same on the screen. Clicking on the icon directly executes again the last command made.

Interactive Calendar

Interactive Calculator

Activates KIU Sense

Activates flight availability graphical search

Activates KIU sense which helps the cryptic terminal with a graphical help.
Displays functional keys configured in the system.

Displays active work areas in both production and test environment.

Displays general screen configuration and allows to save it as a file.Pressing the disc icon a pop up will open this file name so you will be able to work with the preexistent configuration.
Opens My PNRs option. The same is a folder like queues that allows to save and manage PNR or lists outside the work areas independently.
My PNRs
This product allows you to manage and save passenger lists or PNRS in an independently from work areas and the local screen level , which means that it is only recorded on the screen where it is used.
From the work areas you can send as many listings as PNRS to the My PNRs screen.
The way to do it with a list of passengers is as follows: LD4420 / 31JUL-C
-C List Command is indicated and at the end.
Positive answer is OK.
You can also check if the list was correctly placed in the folder.
Once the list is saved and the folder created with the corresponding PNRS you will be able to manage these pnrs by right clicking the mouse on the reservation code where the following options will appear:
- Synchronize
- Modify Remark
- Delete Remark
- Retrieve PNR
- See PNR
- Print PNR
- Move To
- Copy To
- Delete Item
- Create Folder
- Expand All
- Contract All

All these options allow to manage the PNRS sent
At the same time you can send PNRS individually by hovering over the reservation code and right clicking on the option"Send to My PNRs "and the chosen folder.
You can also manage the folders. By right clicking on the folder you can manage them in the following way:
- Synchronize Folder
- Create Folder
- Rename Folder
- Clear Folder
- Delete Folder
- Expand All
- Contract All
- Modify comment
Below are the following options that allow you to configure the My PNRs product.
Options to configure work areas
This functionality allows you to configure different client options. To access the configuration screen, you must access the device from:
Main
- Edit
- View
- Tools
- Areas
- Help
Main
This option enables the user to perform the following functions:
- New Area: opens a new work area. Up to 3 areas can be opened.
- Close Area: closes the active work area.
- Export to: allows you to export the information from the active work area to a file.
- Exit: close the application
Edit
This option enables the user to undo last changes, copy, cut, delete and select a whole text on the screen.
View
This option enables the user to define the bars of the top menu that has to be displayed on the screen.
- Tool Bar: icon bar
- Personal Configuration Bar: custom configuration
- Multiple Help Windows: allows you to open several auxiliary windows on the screen.
Areas
This option enable the user to configure how to visualize work areas.
Tools
From this option you can perform the following configuration functions:
- Reconnect
- Function Keys
- Printer Config
- Options
- Others
Next,you can see the details of functionalities contained in each of them.
Reconnect
It allows to reconnect the system when it turns into disconnected state (lighter screen color).
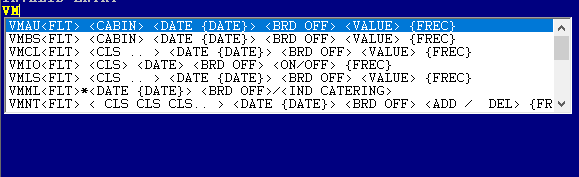
Function Keys
This option allows you to predefine functional keys
System has 24 functional keys that can be configured by selecting the SETUP option of this option. When performing this action the system will display the following screen:
Once you have configured the functional keys with the desired commands, Save File. These will be saved in the terminal and each time it is opened you can use the stored functional keys or using the function keys of the keyboard.
From this window you can also create customized buttons with the functionality that the user chooses. You can add the icons that the user wants to associate with each button. You can configure up to 3 buttons.
Printer Config
This functionality allows you to configure the printers. When selecting this option, the following screen will be displayed:
This screen has three printers available to configure:
1. Local Printer
2. SITA Printer (only for airlines and on request)
3. Boarding Printer (only for airlines)
Local Printer
From this option, the printer can be configured in order to print the voucher receipts and all the commands that are sent to print from the KIU screen.
You must select the printer and the fields must be completed; size, amount of copies, paper size, direction of the page and maximun columns for vertical.
This option works using Windows drivers unless indicated in Print in Printer Port.
The Print in Printer Port option should only be selected if the printer is of the Point Matrix type and is connected to the LPT1 port.
Once the data has been entered, click on the OK button to take the configuration data.
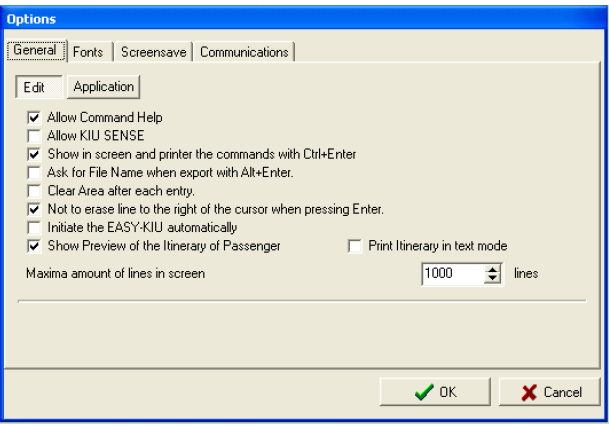
Options
This functionality enables to configure several points of the system's visualization. Modified options must be saved with the OK button or ignored with the Cancel button.The module has different tabs, which are described below:
"General" tab
This window has two buttons: Edit (which configures the area options of the areas) and Application (which configures program options).
"Editor"
Description:
1) Allow Command Help
This option displays a help menu with the necessary items to perform a command.
The menu displayed shows the available commands taking into account the "Duty" with which the last user entered.
This help is only available after signing in the system (Login), currently only used for CRC and Schedule Change entries
2) Allow KIU SENSE
It enables the use of KIU SENSE assistant, which modifies the color of the active PNR, allowing it to make interactive changes with that assistant.
3) Show in screen and print the commands with Ctrl + Enter (Show on screen and print the commands with Ctrl + Enter)
This option allows to display on the screen and send the system response to a printer at the same time.
Example:
4) Ask for file name when exporting with Alt + Enter (Request file name when exporting with Alt + Enter)
This options allows to modify a file name to save when exporting any excel or other file type. When performing this command a pop up will prompt in order to change the name.
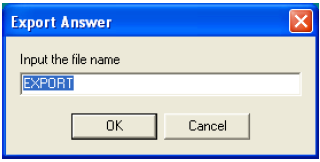
System response is the selected name.
Example:
DONE-FILEC:\DOCUMENTSANDSETTINGS\ADMINISTRATOR\MYDOCUMENTS\EXPORT.TXT
5) Clear area after each entry
With this option, after each Enter, the system clears the screen displaying the command and the response from line 1 of the work area.
6) Do not to clear line to the right of the cursor when pressing Enter
This option allows, when you overwrite a command and press enter it in the middle of the line the cursor goes to the end and does not clear the rest from the cursor position to the right.
7) Initiate EASY KIU automatically
This option activates the EASY KIU graphic wizard each time the terminal is connected.
8) Show preview of the itinerary of passenger (Show preview of passenger itinerary)
This option allows, when printing an electronic ticket receipt, to display a passenger itinerary preview on the screen before sending it to the printer.
This option does not have to be selected if the printer does not support document preview (dot matrix).
9) Maximum amount of lines in screen
This option sets the limit of lines that each work area can contain. When this limit is exceeded, the system clears the screen and the cursor returns to the first line. In this example, if a command displays more than 1000 lines, the system displays them all but when performing the following command the screen will be clear and cursor start from line 1.
10) Print itinerary in text mode (Print the itinerary in text format)
This option allows you to print the ticket receipt in text format as a txt file.
In the same General tab, but in the Application option, you can configure the following:
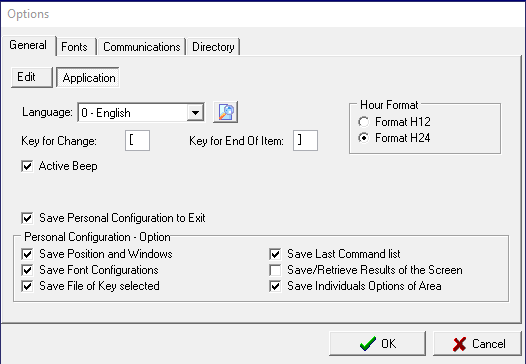
1. Language (Language)
This option allows choosing the system areas default language when they are created.
2. Hour Format (Time Format)
This option allows you to choose the system areas default time format when they are created.
3. Key for Change (Key for Change)
These options allow you to configure the "Change" key (ø, used to make item changes) and "End of Item" (¶, which is used to perform the multi-entry).
4. Activate Beep (Activate Beep)
This option activates a sound each time the system returns an error.
5. Save personal configuration to exit / Personal Configuration - Options (Record personal configuration when exiting / Personal Configuration - Options)
These options indicate the different possibilities of saving the system configuration when closing the application. The saved changes will be used the next time the system.
"Fonts" tab
This screen allows you to specify the fonts type and size that the system will use to type the commands and some responses (Some responses have a default format).
You can also specify different colors and formats (B [bold]: bold, I [italic]: italic) for each of the different response types..

Default Values button restores the original options of the system.
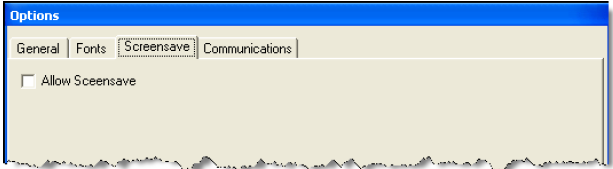
"Screen Save" tab
This screen allows you to activate or deactivate the system's screen saver.
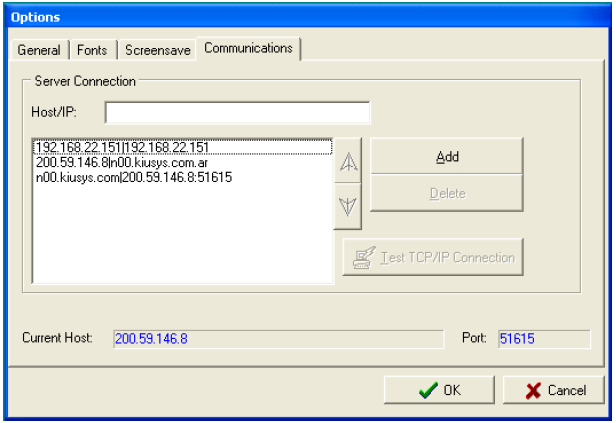
"Communications" tab
This screen allows you to configure the Gateway IP address to which the application will connect. They are added or removed according to the criteria and the connection can be tested before fixing it.
Main Screen
In this section of the screen is where you enter the different commands to work in the system. The way of working on this screen is described in each of the modules that make up KIU.
Bottom Toolbar

Description:
INS: indicates the typing mode (INS: insert or SOB: overwrites the text)
The keyboard symbol indicates whether the screen is active or not. If a red X is present it means that system is not available. In this case you have to check connectivity or wait a few seconds since the system may be processing information.
R: 1 C: 1 indicates the cursor position on the screen (row and column).
EN: indicates the language in which the system will respond to the commands entered. The options can be EN (English) or ES (Spanish). To change from one language to another, double click on the icon or, use the right mouse button.
H24: it indicates the format in which the flight schedules will be visualized when verifying availability. The options can be in 24-hour format (H24) or in AM and PM (H12). To change from one format to another, double click on the icon or use the right mouse button
BUE00XX000: is the terminal installed on the pc.
Group PNRs
As individual PNRs, group PNRs can be divided, the only difference is that in group PNRs there are passengers and booked spaces. The formats are the following:
| DC | Set command indicating group division |
| DC8/2-4,6,9 | Number of passengers/Items numbers |
| DC | Set command indicating group division |
| 8 | Number of spaces to be divided |
| / | Slash |
| 2-4,6,9 | Passenger item number |
In the following example, 8 spaces are divided from the original PNR, items 2 to 4, 6 and 9 (passengers) and other 3 booked spaces.
For example:
In the new PNR, the number of booked spaces and passengers is updated. The following steps are the same as in individual PNR division.
In order to divide booked spaces only, the format is the following:
DC15
Then, 15 booked spaces are divided from the group PNR.
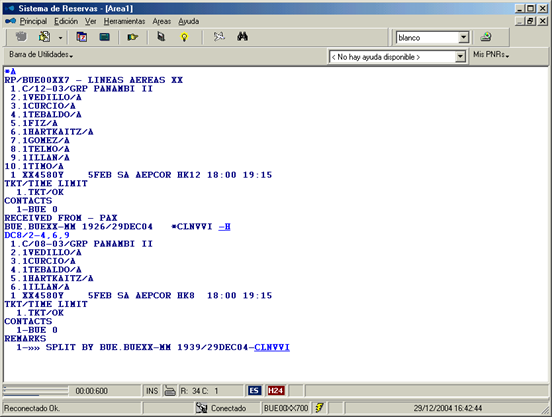
PNR association
Divided PNRs are associated by a Split Remark. In order to retrieve all the PNRs associated, the format is AND, which has to be used after the PNR is retrieved.
For example:
The format ADN is used:
RP/AEP00XX4 - LINEAS AEREAS XX 1.1ARDERIO/A 1 XX4500Y 22MAY SU AEPCOR HK1 07:50 09:00 TKT/TIME LIMIT 1 TKT/OK CONTACTS 1-BUE 565671112 REMARKS 1.»» SPLIT BY BUE.BUEXX-MM 1905/05APR05-XQAOUL BUE.BUEXX-MM 1905/05APR05 *VTKZZY -H
ADN XQAOUL - 3 CARRO/A - CORMEL/A - PROCFIO/W » NQCEYF - 1 ALVES/A » GUXPID - 1 ROMEL/A » KFHZST - 1 BUESTER/A » GCIIOS - 1 PERES/C » DLBIJG - 1 COMINGES/A » VTKZZY - 1 ARDERIO/A |
A list of the associated PNRs is displayed.
In the first line, the system shows the original PNR and the passenger names. Then, the system shows, in a chronological order, the PNRs which are divided first, and then, the divisions made to that division, and so on. The PNRs are followed by the passengers’ names.
The system displays a total of 25 horizontal subdivisions and an unlimited number of vertical subdivisions.
Reduce PNR
The number of passengers on a PNR can be reduced. First, the user must retrieve the PNR, then cancel the desired passenger and finally, reduce the number of spaces booked.
The format to reduce the passenger number on a PNR is the following:
,2 Set command to indicate reduction + number of spaces to be cancelled
Then, the PNR must be ended (E or ER).
For example:
RP/BUE00XX0 - LINEAS AEREAS XX
1.1GENTILCORE/S
2.1SERRANO/V
3.1CASAIS/V
1 XX4580Y 22SEP TH AEPCOR HK3 18:00 19:05
TKT/TIME LIMIT
1 TL BUE 1800/30AUG-TUE
CONTACTS
1-BUE 5371 1151
RECEIVED FROM - MARIANO
BUE.BUEXX-MM 1810/24AUG05 *UXVWEK
In order to delete passenger number 3 the format is:
-3ø
System response:
OK
Then, to reduce the number of spaces booked, the format is the following (Note that: the number to be reduced is the number of spaces that remains on the PNR):
,2
System response:
OK
Then, the system displays the following:
RP/BUE00XX0 - LINEAS AEREAS XX
1.1GENTILCORE/S
2.1SERRANO/V
1 XX4580Y 22SEP TH AEPCOR HK2 18:00 19:05
TKT/TIME LIMIT
1 TL BUE 1800/30AUG-TUE
CONTACTS
1-BUE 5371 1151
RECEIVED FROM - MARIANO
BUE.BUEXX-MM 1810/24AUG05 *UXVWEK -H
The example shows how the PNR passengers are reduce from 3 to 2. First, the third passenger is eliminated and then the spaces booked are reduced to 2.
Important:
After making any changes to the PNR, the RECEIVE FROM FIELD (6) must be completed and the transactions must be ENDED (E or ER).
Increase PNR
The number of passengers on a PNR can be increased. The steps are the following:
1) Display PNR
*WWLOHA
RP/BUE00XX7 - LINEAS AEREAS XX
1.1CATRELLI/ANA
1 XX4520Y 22AUG DO AEPCOR HK1 04:00 05:10
TKT/TIME LIMIT
1.TL BUE 1800/12AUG-THU
CONTACTS
1-BUE 4555 1243
RECEIVED FROM - PAX
BUE.BUEXX-MM 1831/28JUL04 *WWLOHA
2) Introduce passenger name
-FABRINI/JULIA
3) Booked the desired segments
SB2Y1
1 XX4520 Y 22AUG SU AEPCOR SS2 04:00 05:10 0 J32
4) End and store transaction
ER
RP/BUE00XX7 - LINEAS AEREAS XX
1.1CATRELLI/ANA
2.1FABRINI/JULIA
1 XX4520Y 22AUG DO AEPCOR HK2 04:00 05:10
TKT/TIME LIMIT
1.TL BUE 1800/12AUG-THU
CONTACTS
1-BUE 4555 1243
RECEIVED FROM - PAX
BUE.BUEXX-MM 1831/28JUL04 *WWLOHA -H
Note:
When the user books new segments the system cancels the old segments. Then, the confirmation of the new segment request depends on the availability of the new flight selected at that time.
Important:
After making any changes to the PNR, the RECEIVE FROM FIELD (6) must be completed and the transactions must be ENDED (E or ER).
Travel Agency Passengers List
The list can be generated by all those users who have the Duty 2 in their signature. This permission is the one that enables the user to make reservations on flights.
This command will allow the travel agencies to obtain a list of their own passengers on the flights of the airlines.
The command that must be entered is:
LMXX3468/17FEB
Description:
| LM | Set command |
| XX | Airline code |
| 3468 | Flight number |
| / | Slash |
| 17FEB | Date |
Below the heading of the list the following items will be displayed:
- Last name and first name of the passengers in each flight leg (if the passenger is a child or an infant, the indicator CHD or INF will be next to the name as appropriate)
- Booking code (by clicking on the code the PNR can be displayed in a pop-up window)
- Booking class
- Segment Status (HK, TK, KL, KK, UN, HL, HM)
- Agency Office ID
Options
Next, possible options to generate the list of passengers will be mentioned:
LMXX3468
When not entering a date, system assumption is the current date .
LMXX3468 / 17FEBAEP
List generation from a particular airport on the route.
LMXX3468 / 17FEBAEPMDQ
List generation of a particular flight leg.
LMXX3468 / 17FEBAEPALL
List generation from a particular airport of the flight route to all destinations.
LMXX3468 / 17FEBALLBHI
List generation to a particular airport of the flight from all points of possible origin (according to the itinerary of the flight).
LMXX3468 (CTRL + ENTER)
Send the list to the default printer for document printing.
It is also valid, to print, enter the letters PTR before the command, and at the end press the ENTER key on the keyboard. Example: PTRLMXX3468
LMXX3468 (ALT + ENTER)
Generates a txt file with the list information. It can be configured to enter a particular name, to the file that is generated, from the Top Menu of the screen (TOOLS / OPTIONS / GENERAL / EDIT / ASK FOR FILE NAME WHEN EXPORT WITH ALT + ENTER).
Important:
The option LN can be used instead of LM to generate the list. The filters explained above also apply by entering the input LN.
Example: LNXX3468 / 17FEB
Sending the list to Queues
The lists can be sent to the work queues (queues) by entering the command as follows:
LMXX3468/17FEB-Q202
When entering this entry the list will be sent to queue 202.
If the entry is correct, the system will respond OK.
You can send the lists, with any of the filters applied, to queues that are available for users to use (Queues Multilist: 201 to 229).
Flight information
This format displays data regarding the operation of a specified flight:
DO XXFLT/DATE
| DO | Set command |
| XX | Airline code (or by default the host airline uses its own) |
| FLT | Flight number |
| / | Slash to divide flight number and date |
| DATE | Date (or by default the system uses the date on which the request is made) |
For example:

| XX21 | Airline and flight number |
| 0D | Number of days to departure date |
| THU | Operation days |
| 26JUL18 | Requested date |
| BRD | Airport |
| TA | Arrival terminal |
| ARR | Arrival time |
| TD | Departure terminal |
| DEP | Departure time |
| MEAL | Meal service |
| EQP | Aircraft |
| TYPE | Equipment type (J regular or C charter) |
| DIST(Km) | Distance between airports (Km) |
| GRND | Connection time |
| EFT | Estimated flight time |
| TTL | Total amount of operation time |
| TD(Km | Total distance (Km) |
Fares
Fare quote display
The format to display a fare quote is the following:
Carrier or carrier preference
The request can be made by company. This will display the current fares for the requested company (also applicable to the FQT command).
Example:
FQDJNBHRE/AXX
The system uses as default the date on which the request is made.
Description:

LN                                          Line number

01
FARE BASIS                           Fare basis

YMJNBOW
OW                                        One way

260                                        Value
USD                                   Currency code


RT                                    Round trip

320                                   Value


B                                     Booking class

V


PEN                                  Penalties


DATES/DAYS                           Flight days of operation


AP                                   Advanced Purchase


MIN / MAX                            Minimum and maximum stay


R                                    Other restrictions
Historical fare display
This command display fares that were effective until 23:59:59 of the indicated date (if any change was made during the display,the last change in effect that day will be displayed.
FQDXXXXXX(city pair)/Ddaymonthnyear
Example:
FQDBUETUC/D24AUG17
Negotiated/private fares
In order to display negotiated/private fares, the format is the following (also for FQT format):
FQDBUETUC/P
P negotiated/private fare indicator
This format displays fares including SALES RESTRICTIONS according to the authorized office.
Display a fare indicating passenger type(PTC)
In order to display a fare that is filed with an specific passenger type the following entry has to be done:
FQDAEPCOR/PYTH
Response:
FQDAEPCOR/PYTH

MORE FARES AVAIL IN USD                    TAX MAY APPLY
",THE FOLLOWING CARRIERS ALSO PUBLISH FARES AEP-COR
 5U
06NOV2017**06NOV2017/XX AEPCOR/PTC-YTH
LN FARE BASIS             OW  ARS          RT B PEN  DATES/DAYS   AP MIN MAX R
01 YYTH                  150              300 Y  -       -        -   -   -  R
System response also displays passengert type YTH
06NOV2017**06NOV2017/XX AEPCOR/PTC-YTH
If no fare is published with PTC YTH system will respond:
NO FARES
If the PTC code is not available in the system the response will be:
NO FARES/RBD/CARRIER/PASSENGER TYPE
List of passenger type code
| Passenger type code | Description |
|---|---|
| ADT | Adult |
| ADR | Adult Resident |
| GOV | GVT Blended: government |
| MIL | Military confirmed passenger |
| YTH | Youth confirmed |
| YCD | Senior citizen |
| STU | Student |
| ACC | Accompanied person |
| GRP | Group |
| FFY | Frequent Flyer |
| EMI | Emigrant |
| CPN | Coupon discount passenger |
| CNN | Accompanied child |
| CMP | Companion |
| CMA | Adult with companion |
| BLD | Blind passenger |
| BAG | Excess baggage |
| MED | Patients travel for medical treatment |
| INS | Infant occupying a seat |
| INF | Infant not occupying a seat |
| FNN | Family plan child |
| HOF | Head of family |
| REF | Refugee |
| UNN | Unaccompanied child |
| TUR | Tour Conductor |
| DIS | Disabled |
| WEB | Internet fares |
Fare rule display
In order to display the fare rules, the following format must be entered after a fare quote display:
FQN FARELINENUMBER
For example:

Then, in order to open the Y fare rules, the format is the following:
FQN1
In order to display only a specified fare rule category, the format is the following:
FQN1-LI
| FQN1 | Set command |
| - | Set command to separate format |
| LI | Fare rule category indicator |
Also, a partial description of the fare rule can be display using the following format:
FQN1-RU/FL/CD
| FQN1 | Set command |
| - | Set command to separate format |
| RU | category code |
| / | Set command to separate format |
| FL | category code |
| / | Set command to separate format |
| CD | category code |
Taxes and fees display
This format is used to display airport, country or company taxes and fees. The formats are detailed below.
By country
TX*ZA
| TX* | Set command |
| ZA | Country code |
Description:
| CODE | Tax or fee code |
| DESCRIPTION | Code description |
| TRIP | Trip type (domestic or international) |
| AMOUNT/PERCENT | Fixed amount (and currency code) or percentage |
| PAXS | Applicable on which passenger type |
| TKT | Included on the e-ticket (Y: yes - N: no) |
| CONEX | Time considered connection |
| CARRIERS EXCEPTS | Carriers which exempts taxes and fees |
By airport
TX*AEP
| TX* | Set command |
| AEP | Airport code |
By airport and carrier/airline
TX*AEP/5U
TX* Set command
AEP Airport code
/ Slash
5U Carrier/airline code
| TX* | Set command |
| AEP | Airport code |
| / | Slash |
| 5U | Carrier/airline code |
Messages
The user can send messages from one terminal to another. The messages are displayed on all the connected devices.
How to send messages
The format to send messages is the following:
MSG
System response:
TO is the terminal to which the message is sent or, also, the office to which the message is sent (in this case, the message is received by all the active devices at that office). In order to send a message to several terminals at the same time, the user must leave a space between terminals.
For example: BUE00XX201 (terminal) or BUE00XX2 (office)
FROM is the terminal sending the messages.
PRIORITY is the priority of the message: LOW, NORMAL, HIGH.
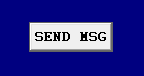
The text box is where the user writes the message. Once the message is finished, the user must press SEND MSG. In order to cancel the message, the user must press CANCEL before sending the message.
The system response after sending the message is:
OK. MSG SENT TO: BUE00XX201
The addressee receives the message in a pop up window:
For example:
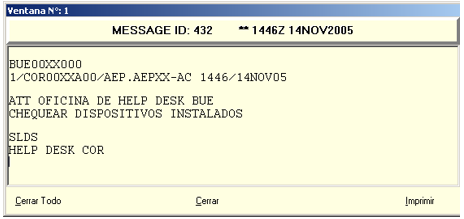
The message can be printed or the pop up window can be closed. Once closed, it cannot be open again
Message responses
In order to respond a message, the user must enter the following format:
MSGR {Message ID}/response text
For example:
MSGR432/message received. Thank you.
Important:
The Message ID is displayed only in the pop up. Once the pop up is closed, the ID cannot be retrieved.
The validity of the Message ID is 2 hours from the time the message is received. Then, responses cannot be sent.
Queues
Queues are system files where PNRs or messages can be stored. There are some that are pre-established and others free. The function of the pre-established queues is to store PNRs or messages that have some notice to inform the passenger or to facilitate the work of the operator when checking the status of reservations.
List of pre-established queues
From queue 1 to 100 there will be PNRs that for some reason have been automatically placed on queues, they are pre-established queues that must be worked manually.
PNRs that are inside queues are not repeated in the same queue if they are placed and are already inside.
From queue 201 onwards, they are free to store passenger lists or PNRs.
Below are the queue numbers and their respective description:
Queue 1
Stores all those PNRs that are within 24 hours of their due date. The PNRs that are removed will be placed again when the system repeats the check process. This process checks all PNRs every hour.
Queue 2
Stores all those PNRs that are within 48 hours of their due date. The process of the PNRs is identical to queue 1.
Queue 3
Stores all those PNRs to which the ROBOT TL has modified the time limit (expiration).
Queue 5
Stores all those PNRs that were automatically canceled by expiration.
Queue 7
Stores PNRS that have been manually canceled by another airline (in case there are agreements within KIU).
For example, travel agencies can view the reservations that the airline has canceled manually.
Queue 10
Store PNRs that have been confirmed from a waiting list, automatically by the system. All PNRs with status KL.
Queue 20
Stores individual PNRs with required status (HM), either because the flight is in a required state or for some other reason.
Queue 25
Stores individual PNRs that have been with required status (HM) and have been confirmed (status KK).
Queue 30
Store PNRs that have had some modification in the flight, and should be informed. They are those who have suffered some Schedule Change process. Therefore, they will be found with status UN and TK or TL. In this case, the own PNRs generated in the pseudo city itself will be saved.
Queue 40
Stores group PNRs with required status (HM). Those PNRs will be placed on queue of the flight management airline to notify them that there is a group in request and in the generator to keep track of the groups requested.
Queue 45
Stores group PNRs that have been confirmed after being required with status (HM).Those PNRs will be placed in the queue of the generating company to notify it that such group has been confirmed.
Queue 60
Stores PNRs whose passengers tickets have been partially issued, leaving passengers without their corresponding ticket issuance. It allows controlling passengers without ticketing within the same PNR with passengers issued.
Queue 65
Stores the PNRS that have been transferred by the airline to another company (agency, airline, etc.). This way, it is possible to control the transfer of PNRS from the company to others.
Queue 66
Stores PNRS that have been transferred from one agency to another or to the airline.
Queue 68
Stores the PNRS that have been sent by the agency to the airline.
Queues 201 onwards
Free queues to store passenger lists or PNRs.
Complete Queue Count
To access the full queue count, the command is as follows:
QCT/CTY
Description:
| QCT/ | Fixed command |
| CTY | City where the queue list is requested |
Note:
The command can be made without adding the city, the result will be a queue count of the city where the agent is positioned.
Active Queues Count
If you want to access only the queues that have activity, and stop viewing the queues that are empty, the command is:
QC/

| QUEUE | Queue number |
| ITEMS | Number of PNRS or stored messages |
| WORK | Number of PNR or messages in work |
| Description | Queue name |
Options
Below are other options to display queues.
| QC / 10 | Display queue number 10 only |
| QC / 30 * | Displays only queue number 30 and the users signs working on it. |

The display shows the signs of those who are working on that queue and the PNR code that has been retrieved at that moment.
Other options to display queue counts are:
| QC/ALL | Shows all active queues |
| QC/ALL1 | Shows all active queues 1 |
Contact view of a queue (PNR queues only)
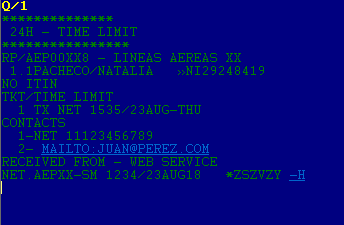
To visualize the contacts in queue without accessing it, there is a command that displays a list of them. The command is:
Q/number*
Example
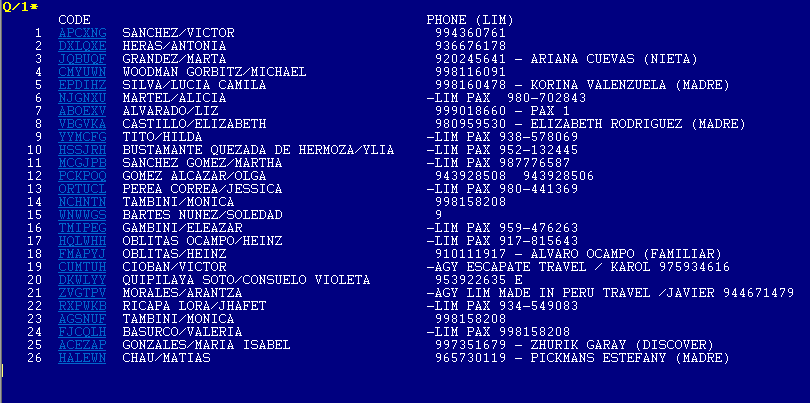
| ITEM | Item number |
| CODE | Booking code with link to retrieve |
| ## | Number of passengers in the PNR |
| TITULAR | First surname in the PNR |
| PHONE | First contact number in the pnr related to a specific location |
Display queue elements with phone contacts from another city
You can get the same list but only retrieving the contacts of a specific city.
The command is the following:
Q/number*/CTY
Q/1*/SLA
Response:
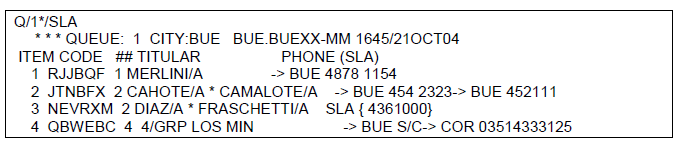
The phones of the requested city will be seen first and separated in brackets. Those PNRs that do not have telephones of the requested city will show the available ones with an arrow in front of them.
To retrieve the list of e-mail contacts. The command is the following:
Q/number *NET

Unlike the phone contact display, those who do not have mails in the contact field, will be marked with an asterisk.
Access a specific queue
To access a specific queue, you must enter the following command:
Q/1
Description
| Q/ | Fixed command |
| 1 | Queue number |
Response
Redisplay within queues
To redisplay a PNR or a message while in a queue, one of the following commands must be entered as appropriate:
*A Redisplays last PNR
Place a PNR on a queue
To place a PNR on a queue the command must be performed with the PNR displayed as follows:
QP/210
Description
| QP/ | Fixed command |
| 210 | Queue number |
Response:
| OK |
|---|
Transfer a PNR from an agency to an airline queue.
You can transfer a PNR from an agency to an airline queue. To do this, the PNR must have at least one segment of the airline which will receive the PNR. It will be placed on queue 68 of the associated office where it was addressed. The command is (having the PNR displayed on the screen):
QP/-COR00XX4
Place a PNR on queue and add a text
Place a PNR on a queue and add a text This field is optional. The maximum number of characters is 50.
The text must be entered after an asterisk as shown below:
QP / 210 * free text
The message entered will then be displayed on the top of the PNR sent to the queue.
Place a PNR on queue indicating time
A PNR can be placed on a queue indicating the number of hours ahead that the PNR is placed on queue.
- This field is optional. The maximum number of hours to enter is 99.
- The number of hours must be entered after the + symbol as shown below:
QP/210+2
In the previous example, the PNR displayed on the screen will be placed on queue 210 in the next 2 hours.
To this entry you can also add an optional message as shown below: QP / 210 + 2 * free text
Place a PNR on queue indicating day
A PNR can be placed on a queue indicating the date.
- This field is optional.
- The day must be entered after the + symbol as shown below
QP/210+24DEC
In the previous example the PNR displayed on screen will be placed on queue 210 on December 24th. An optional free text can also be added as shown next:
QP/210+24DEC*free text
Place a PNR on several queues at the same time
A PNR can be placed on several queues in the same transaction as displayed next:
QP/210/209
In this example above the PNR will be placed on both queue 210 and 209 with the same command.
Other combinations
Other possible combinations to place a PNR on queue are:
QP/209/210+8*free text
This entry will place the PNR on queues 209 and 210 8 hours after with the message added in the entry.
QP/209+27DEC*free text /HDQ210+2/-205
This entry will place the PNR on queue 209 on 27DEC and with the free text added,besides that PNR will also be placed on queue 210 in a two hours time and at last will also be placed on the own user queue 205. Hyphen before queue number means own queue.
Move or remove a PNR from a queue
To move or remove a PNR from a queue, one of the following commands can be used:
| QR | Removes the PNR and displays the next one. |
| I | Move the PNR within the queue without removing it and displaying the next one. |
| E | Close the PNR and remove it. (Only PNRs) |
Other options
| QR+20DEC | Removes the PNR and will place it again on queue on the indicated date. |
| QR+8 | Removes PNR and will be placed again in the next 8 hours. 1 and 99 can be indicated in this command. An optional text can be added at the end of the entry. |
Note:
Inside the messages queue you must ignore a PNR or message or close it if present if you want to retrieve a PNR.. Therefore, the I(ignore) command must be done twice, once for the PNR and once for the message.
Remove all PNRs from a queue
To remove all PNRs from a queue the following command must be used.
QZAP/201
Description:
| QZAP | Fixed command |
| / | Slash |
| 201 | queue number |
Note:
It is not necessary to add the city code when removing PNRs from the city where user is signed.
This command can only be done for PNR queues.
Move all PNRs from one queue to another
To move all PNRS from a queue to another the following command must be used.
QMOV/214/212
Description:
| QMOVE | Fixed command |
| / | Slash |
| 214 | Queue number where PNRs are located |
| / | Slash |
| 212 | Queue number where PNRS will be moved. |
Note
This command can only be done for PNR queues.
Copy all PNRs from one queue to another.
To copy all PNRS from one queue to another the following command must be used.
QCOPY/BUE204/NQN210
Description:
| QCOPY | Fixed command |
| / | Slash |
| BUE204 | Queue number where PNRs are located |
| / | Slash |
| NQN210 | Queue where PNRS will be copied. |
Note:
When copying PNRs from the same city where the user is assigned it is not necessary to enter the city code.
Example:
QMOV/204/210
This command can only be done for PNR queues.
Exit queues
When working on queues you can exit with the following command.
QXI Exits the queue and ignores changes if any.
QXE Exits the queue and saves the changes if any (only for PNRs).
QXR Exits the queue and removes the last displayed PNR.
Work a PNR on queues
- PNRs can be worked on queues normally, it is only necessary to take into account that, when ending transaction with the E command it will be removed from the queue and the next will be displayed.
- You can end transaction with ER (close and retrieve) if you want to keep it on queues, and then ignore it (I) to move on to the next one.
Display the queues history within a PNR
To visualize the queue transactions that have affected a PNR, the following command is performed:
*QH
This command allows you to see all the PNR transactions that have occurred on the different queues. Basically, the possible transactions are the inputs and outputs, manually or automatically.
Keyword QHSHOW allows to view all the transactions that the PNR has had on all the queues of all the companies that have had access.
Example;
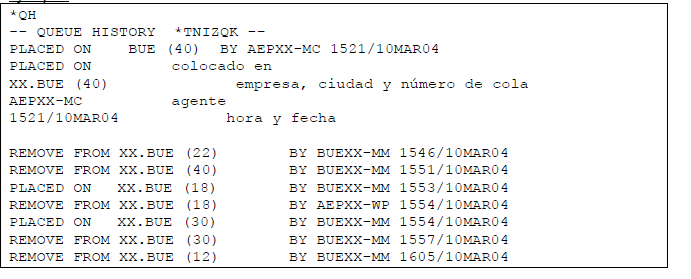
Note:
When the PNR is automatically placed on queues by system action the SYS sign will be recorded instead of the agent´s.
The following queues generate transaction information in the *QH command:
- 10 WAIT LIST CONFIRMED
- 20 PNR – REQUIRED
- 25 PNR – CONFIRMED
- 30 SCHEDULE CHANGE
- 40 GROUPS – REQUIRED
- 45 GROUPS – CONFIRMED
- 60 PARTIAL ISSUES
- 61 7T – AGENCY
- 62 7T – HOST
- 65 RP TO OTHER
- 80 AGENCY ISSUE MASK
- 82 AGENCY PRICE FORCED
- 83 AGENCY ISSUE FORCED
- 84 HOST PRICE FORCED
- 85 HOST ISSUE FORCED
Note:
The PNRs and messages will remain on the queues for a period of 7 days, counting from the date of queue placement. Once this period has elapsed, the PNRs and / or messages will be automatically removed from the queues without leaving a record in the story if they were not removed before.
View the active queues of a PNR
To visualize the queues in which the PNR is active, the following command is executed:
*QA
This command allows you to view all the queues where the PNR is active. Once the PNR has been removed from the queue, this transaction can be viewed with the * QH command explained above.
Example:

Notes:
1. In order to execute this command, the user must have the DUTY 3 associated with his / her signature.
2. In order to execute this command, the PNR must be displayed on the screen
Display consolidated Sales Report Summary
You can request a summary of all the sales reports of an office generated on the day or on a specific day. Keep in mind that when issued in two types of currency, the sales report is divided. To do this, the keyword RPGSPV is required and access to the HDQ city
The command is:
WR/OFFICE/DATE
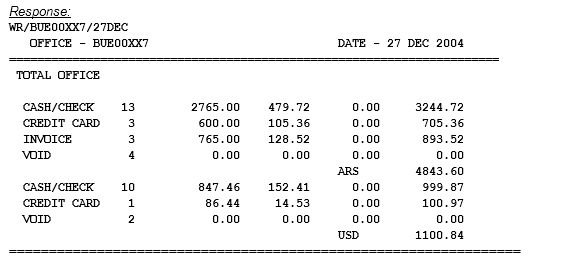
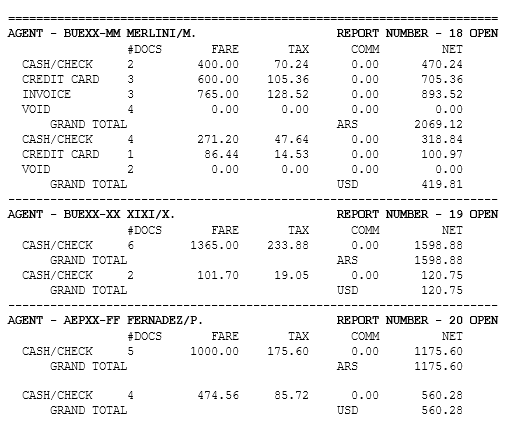
You can also view the same report detailed by agents.
The command is:
WR/OFFICE/DATE*
WR/BUE00XX7/27DEC*
OFFICE - BUE00XX7 DATE - 27 DEC 2004
============================================================
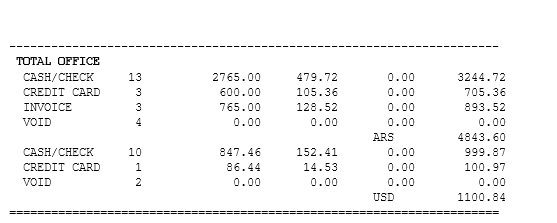
With RPOFFI Keyword you can retrieve the reports for all agents on the same office.
Note:
If the office or the date is not declared, the system takes by default the office where the command is being executed and the date of the day, anyway, it would be mandatory to use a double bar that would frame the office.
The command in this case is:
WR//                For basic summary

WR//*               For detailed summary
ISSUING AN E-TICKET
Electronic Ticketing (e-ticketing) allows you to sell air transportation without issuing printed tickets. It also allows passengers to check in and board flights without holding printed tickets.
Considerations
- System issues an electronic ticket with four coupons,
- E-tickets that have more than four segments will be issued in a conjunction ticket/tickets in the same transaction
In order to issue a ticket, the reservation must be previously priced and the fare must be stored.
PNR must not have any UN segments and it is advisable that the status codes be updated and previously recorded. (HK, HL, HM, MM). The system will issue exactly as priced.
System allows to issue twice or more times an electronic ticket for the same passenger within the same PNR and same segments, but from the second issuance for the same passenger ,the system sends an alert before performing the ticketing transaction.
If company policy is to require document information in the name field you can add this info before issuing a ticket with the following entry:
-1ø.NI 2041627 Changes or adds passport or document information
| - | hyphen |
| 1 | Indicate the passenger name item |
ø | change sign |
| . | dot indicating document type |
| NI | Document type NI National Identity Number PP Passport ID Locally Defined ID number |
Issue ticket with cash form of payment
The following PNR is an example to issue a ticket with cash form of payment.
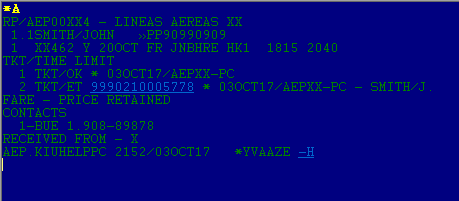
WK*FCA |
Description
| WK* | Ticketing Command |
| F | Form of payment indicator |
| CA | Cash |
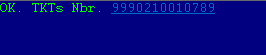
System response
OK. TKTs Nbr. 9990210005790
The answer is OK followed by the ticket numbers issued with a link to your display it on screen.
When you retrieve the PNR the tickets will be display in this format.
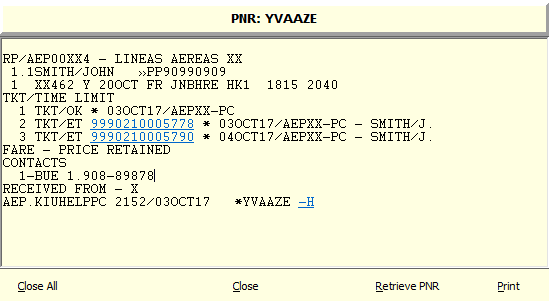
Considerations
- In the TKT / TIME LIMIT field, you can see that the deadline in element 1 was replaced by TKT/OK ,ticketing date and ticketing agent initials.
- From element 2 onward you will see the numbers of tickets with a link followed by the issue date,user initials and passenger last name and initial
- To retrieve the data of the issued ticket can be done with CONTROL + CLICK with the mouse on the ticket link or the ET / {ticket number} command in the PNR.(This command is developed in chapter ETICKET PRINTING AND RETRIEVAL of this manual).
- You can display the ticket on a help screen only by clicking over the ticket link.
- All these considerations are accepted for all possible forms of payment.
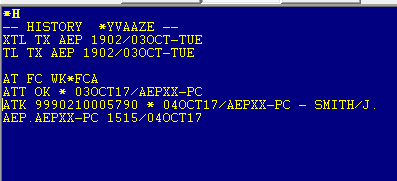
PNR history will display ticketing details.
Issue ticket with check form of payment
The system accepts a check as another form of payment The command for issuing with form of payment check is:
WK*FCK123455878 HSBC |
| WK* | Ticketing command |
| F | F form of payment indicator |
| CK | Check indicator.Free text after CK |
| HSBC | Free text |
Note: In the WR sales report this form of payment will be unified with CASH form of payment.
Issue ticket with credit card form of payment
The entry for issuing with credit card is:
WK*F/VI4054343467672121/1204/Z8990 |
| WK* | Ticketing Command |
| F | Form of payment indicator |
| / | Slash |
| VI4054343467672121 | Credit card code and number |
| / | Slash |
| 1204 | Expire date |
| / | Slash |
| Z8990 | Approval code. |
Issue ticket with extended credit card payment
WK*F/AX3489798789789797/1206/Z1235/C1 |
In the ticketing command with credit card extended payment you can indicate the amount of installments which can be up to 12 in the C indicator
Batch Sale
L batch number indicator
Example
WK*F/AX3489798789789797/1206/Z1235/L354
Batch sale can be 1 to 6 digits long.It can be used for exchanges too.
WK*F/AX3489798789789797/1206/Z1235/L354 |
In case you need to combine both installments and batch , installments must go first.
WK*F/AX3489798789789797/1206/Z1235/C1/L354 |
Issue ticket with debit card form of payment
Ticketing with debit card entry is as follows;
WK*F.EL4054343467672121/Z123 |
WK*F.EL4054343467672121/Z123
| WK* | Ticketing Command |
| F | Form of payment indicator |
| . | Indicates debit card. |
| EL4054343467672121 | Debit card company and number |
| / | Slash |
| Z123 | Approval code. (Z is mandatory) |
Add Batch Number
If you need to add batch number for debit card transactions you can use the L indicator to the ticketing entry which allows up to 6 digits.
Entry
WK*F.EL456465464646/Z1235/L354 |
Issue ticket with multiple form of payment
KIU System accepts up to two different forms of payment in the multiple ticket issuance. You can combine any of the two forms of payment.
WK*FCA#/VI4054343467672121/1204/Z8990-120/40XT |
| WK* | Ticketing command |
| F | form of payment indicator |
| CA | cash indicator |
| # | Pound Sign to split two forms of payment |
| /VI4054343467672121 | slash,credit card code and number |
| / | slash |
| 1204 | expire date |
| / | slash |
| Z8990 | Approval code preceded by Z |
| - | hyphen |
| 120 | amount to be paid in second form of payment |
| / | slash |
| XT | Total Tax amount plus Total Tax amount code |
Considerations
- The amount paid in the second form of payment is specified, the system will deduct it automatically from the total, and will be reflected it in the sales report.
The fare amount paid in the second form of payment can never be greater than the net fare.
- When this entry is performed system assumption is that the amount input is for all passengers in the PNR unless it is specified by passenger selection of passenger type code like CHD or ADT in the ticketing entry.
- You cannot combine payment methods that have an online validation (credit card plus electronic accounts.)
Issue Ticket with Invoice Form of Payment
The command for the form of payment to invoice is:
WK*FIN/MEDITERRANEAN |
| WK* | Ticketing Command |
| F | Form of payment indicator |
| IN/ | Invoice form of payment |
| MEDITERRANEAN | Free text in this case it is an account name. |
Note: Issuing a ticket and paying with invoice and debiting from the electronic account will discount the virtual report as explained in Electronic Accounts Manual.
Issue Ticket with Miscellaneous or Free Form of Payment.
This form of payment can be used when there is a form of payment that is not described in the previous ones. The command for the free form of payment is:
WK*FXX FREE PAYROLL |
You can also use the following entry as an option for the miscellaneous payment method.
WK*FMS/TO MIGRATION TICKETS |
| MS | Fixed command |
| / | Slash |
| TO | Miscellaneous form of payment |
| MIGRATION TICKETS | Free text |
MANUAL EXCHANGES
Exchange form of payment can be performed on electronic tickets. System validates the statuses on the ticket provided OPEN FOR USE is the current status.
Considerations:
Price the itinerary to be issued in the same way as any other form of payment of those allowed by the system since the Exchange is another form of payment
Once you have priced the itinerary to be issued, record the PNR.- Display the e-ticket to be exchanged.
It should be taken into account that passengers within the PNR will be issued from one at a time.
- Name change is not allowed in exchanges. Same passenger name can be exchanged.
You can not partially exchange a ticket.Full exchange is only allowed. All coupons that are open (with status O) can be exchanged.
The system allows the Exchange of a ticket through COMMANDS or MASK according to the transaction depending on the transaction.
Manual Exchange with a Mask Screen
- Easy to complete mask screen with payment information
- Old ticket will change status to Exchanged and new ticket to Open for Use
To begin the manual exchange use the following entry:
WK*FEX
STEP 1

Transaction type Step Passenger Last and First Name

Ticket or document to be exchanged and verification digit Regarding to the CPN DATA field, the letter A indicates that they are exchanged all (ALL) ticket coupons. If there is at least 1 coupon in the ticket used, this field will indicate the numbers of coupons that are being exchanged.

Original Issue, Origin Issue Date/Place/Original Issue Office/ Form of Payment
original ticket

Currency code and net fare amount This information will be shown by the system automatically extracted from the ticket in question, provided that the exchange is for the total of the ticket . When the exchange is partial (there may be coupons with status F, R, etc.) the user must complete the box for the value of the coupons to be exchanged. This is valid for the following boxes in step 1 (EQUIV PAID CURRENCY / AMOUNT and PD TAX AND CODES)

Original ticket fare amount equivalent

Paid taxes and fees on the original ticket, followed by their respective code . There are 8 boxes to collect all the necessary taxes and fees. In case the total of the coupons of the original ticket is exchanged the system will complete the taxes with the fees and taxes corresponding to that ticket.

If you want to cancel the mask, use the CANCEL button

The NEXT button should be clicked to continue with the next mask step. In case the amount of the new ticket that is exchanged has at least one used coupon , the system will warn the user with the following legend:

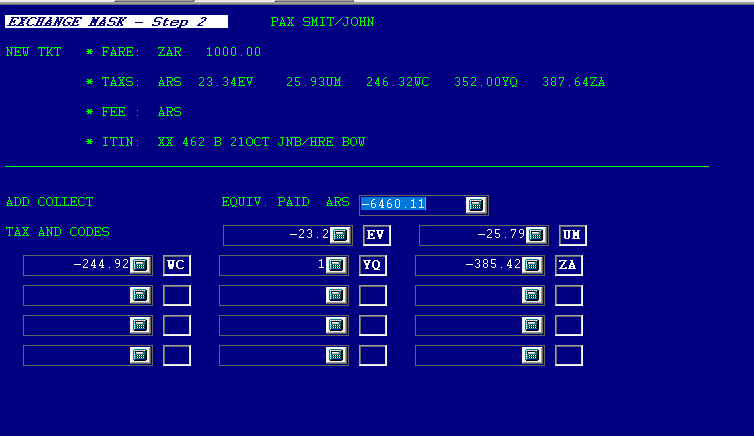
STEP 2

Exchange Mask - Step 2 Last Name, Name and Type of Passenger

Net fare and taxes details of the new ticket.

Currency type and additional amount to be paid

In order to continue you must click next
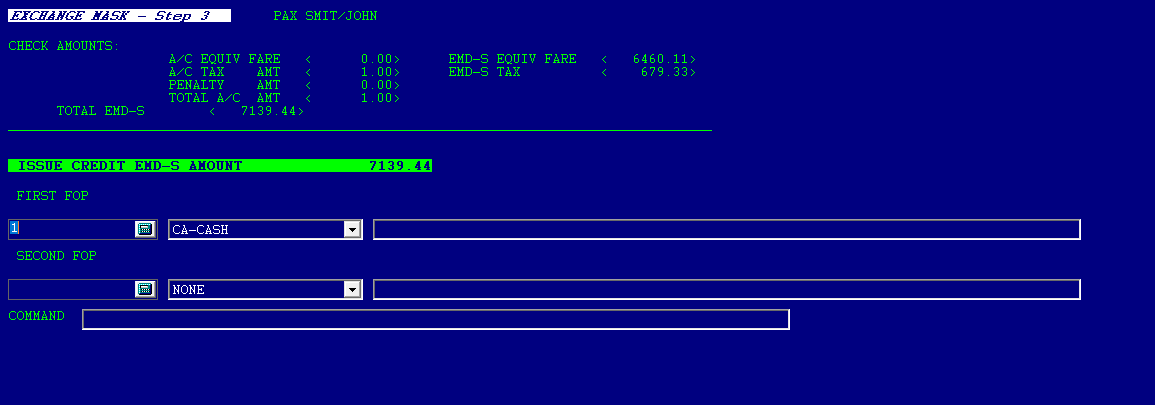
STEP 3

Exchange Mask Step 3 Last and First name
System will respond:
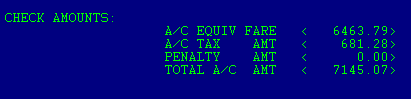
A / C EQUIV. FARE: Fare Additional collection in equivalent currency if applicable.
A / C TAX AMT: Tax Add collect
PENALTY AMT: Penalty Amount to be paid.
TOTAL A / C AMT: Total amount to be collected.
Note:
The amounts reflected in step 3 will be automatically converted by the system to the local currency of the issuing country or as indicated during ticketing.

First For of Payment Amount + Payment Code

Second form of payment amount and code. In this case, as form of payment is a credit card you must enter all the details such as credit card company code ,number,expire date and approval code separated by slashes.

This box allows to fill in with the necessary data in case of using other qualifiers, such as discounted rates, remote issuance, modification or exception of fees, endorsements, commissions, etc.

Click NEXT to end with the Exchange transaction and issue the new ticket.
The system will close the mask, returning to the application screen where the new ticket number will be displayed.
The new issued ticket will have a link to open and display it.
Once the new ticket has been issued, the ticket coupons used as payment method will change to status EXCHANGED as seen in the following example:

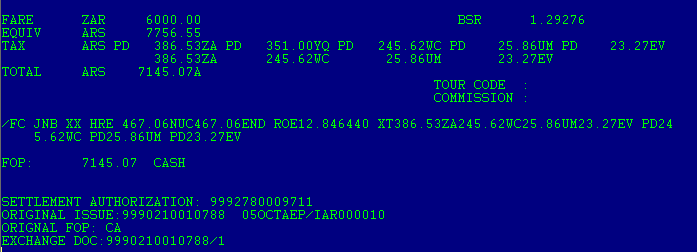
In the new ticket, the same reservation data of is extracted (last name, name, sections, etc.) and the the fare construction of the ticket will have the following characteristics.
- In the FARE and EQUIV box new amounts will be displayed if applies.
Paid taxes will be displayed as PD with the corresponding amount and tax code.
The rest of the taxes total amount in XT and then detailed in the fare construction.
In the lower part of the ticket you will see the details of Original issue,date,Ticketing agent,Original Form of payment ,original ticket number,and ESAC (Electronic Settlement Authorization Code)
Options
Passenger select
You can select passengers with the following entry;
N = Name item+ item number
WK*FEX*N1
Segments select
Also you can select segments.
S = Segments
WK*FEX*S1,3-5
Manual Exchange with Refundable Balance
For Manual Exchanges where calculations result in a residual amount, depending on the carrier and fare rule, you may be able to refund that amount to the passenger issuing an EMD-S.
In this case passenger will have those WC,EV,UM and ZA taxes amounts refunded.
You click NEXT and you will see following screen
There is no fare additional collection. You see that system will issue an EMD-S of 6460.11 refundable amount for residual fare and 679,33 residual taxes.
You can display EMD with the following entry:
EMD/element number
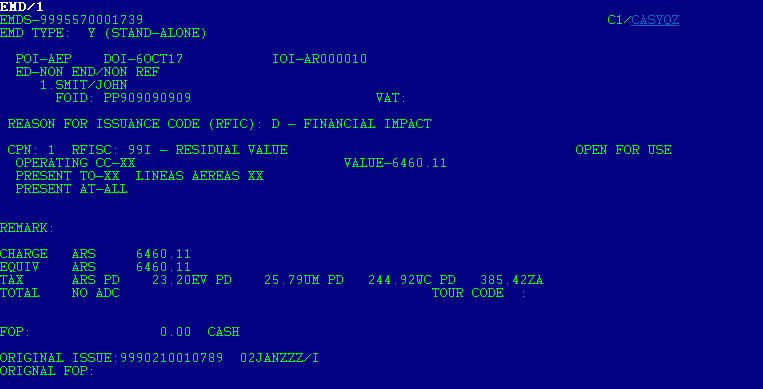
You will see the reason for issuance code which is Financial Impact with a residual value of 6460.11 to be used for future travel or refunded if applies.
In case taxes were not applicable by the time of issuance or did not apply system will display them in this screen.
Manual Exchange by Commands.
This mode will be used for a single ticket and in full exchanges only. In case there is a used coupon or an exchange with residual value a mask must be used instead of commands. In case you want to do it by commands system will display a mask to complete with the data.
This Exchange mode allows the system to automatically calculate the amounts net of the fee to be taken as part of payment, difference in charge rate, penalty, additional fees and taxes, etc., without the need to use the mask.
Manual Exchange with additional collection.
WK*FEX#CA
| WK*FEX | Fixed format |
| # | Pound Sign |
| CA | Cash form of payment when additional collection exists. |
When executing this command the system will return the following information in response:
Description:
EXCHANGE DOC NUMBER: ticket number to be exchanged, passenger name and type
ADDITIONAL COLLECT AMOUNTS: The system will calculate the fare difference to be collected and reflected by comparing the values of the exchanged ticket and the ticket to be issued.
EQUIV FARE: in this field the amount to be charged as difference will be displayed.
ARS: Currency code of the amount to be charged.
OLD: net fare that will be taken as part of payment towards the issuance of the new ticket.
NEW: Net value of the new fare.
TAX: in each of the OLD and NEW columns
PENALTY: this field will reflect the amount of the penalty to be charged.
TOTAL: in this field the total amount to be charged as difference, net rate plus taxes
A / C TAXS DETAILS: in this field you will see the additional fare amounts and taxes to be charged on the new itinerary
The system will display the following warning when ticketing
To confirm the Exchange transaction you must execute the same command by adding it / Y at the end of it, or move the cursor to the end of the second line of the system response and press the ENTER key
OK. TKTs Nr and EMD ISSUED.: New ticket number will be displayed and EMDS with the additional collection.
Manual Exchange with additional collection and two forms of payment.
In this case, you can use two forms of payment in addition to the exchange.
- Use the same criteria for multiple form of payment, placing the first form of payment separate from the second with a # pound sign and after placing the second form of payment .
- After second form of payment add a hyphen and add the amount of the second form of payment and then add a slash and then total tax amout followed by XT
WK*FEX#CA#/DC4546424205891254/1010/Z123-108/57.26
| WK*FEX | Ticketing command |
| # | Pound Sign to split two forms of payment |
| CA | cash indicator |
| # | Pound Sign to split first form of payment |
| /DC4546424205891254 | slash,credit card code and number |
| / | slash |
| 1010 | expire date |
| / | slash |
| Z123 | Approval code preceded by Z |
| - | hyphen |
| 108 | amount to be paid in second form of payment |
| / | slash |
| XT | Total Tax amount plus Total Tax amount code |
.
Manual Exchange with Penalty Collection
Whenever you need to add a penalty on an exchange you need to perform the following entry.
WK*FEX#CA*PE50
| WK*FEX | Fixed format |
| # | Pound sign |
| CA | Cash form of payment |
| *PE | Penalty indicator |
| 50 | Penalty amount |
And still confirm with /Y in order to complete the transaction
Manual Exchange applying discounts.
WK*FEX#CA*Q/AD90/DP90X
Pricing stored in the PNR should match the discount indicator applied. In the example WS * Q / AD90 / DP90X
Manual Exchange Selecting Passengers
WK*FEX#CA*N1
Manual Exchange Selecting segments
In case you want to select the segments of the new itinerary to be exchanged. If you do not specify the segments system will reprice whole PNR route by default.
WK*FEX#CA*S1
Note:
Pricing stored in PNR should match the segment indicator applied. In the example WS * S1.
Fill in Masks for ticketing
The objective of the masks is to be able to issue tickets with fares that are not published. Pricing masks must be created first to be able to take the necessary information and store it in order to be able to issue the ticket. The mask will be stored with a validity period of 30 days and after that it will be deleted.
Create Mask Header with Graphical Assistant
To create a mask it is necessary to have a newly retrieved PNR (without any recent modifications) and with no UN segments.
In case of having to make any modifications in the PNR, theses must be done first, recorded and then you must retrieve the unchanged status PNR.
The command to start creating a mask is:
W*TKT
This command displays the following screen
- To enter the different Tour Code options, the U indicator must be omitted. example: instead of entering UB / <TOUR CODE> to hide the fare, you must enter only B / <TOUR CODE>. In case you want to use the option UN in the fare mask,it will not be necessary to enter the acronym.
- Currencies offered in the mask correspond to those configured in the country of origin of the trip ,and those of the country of the terminal that is creating the mask.
Once this screen is recovered, the data corresponding to each box is loaded,Once you have completed the necessary data, you will go to the next screen, by pressing the button
NEXT
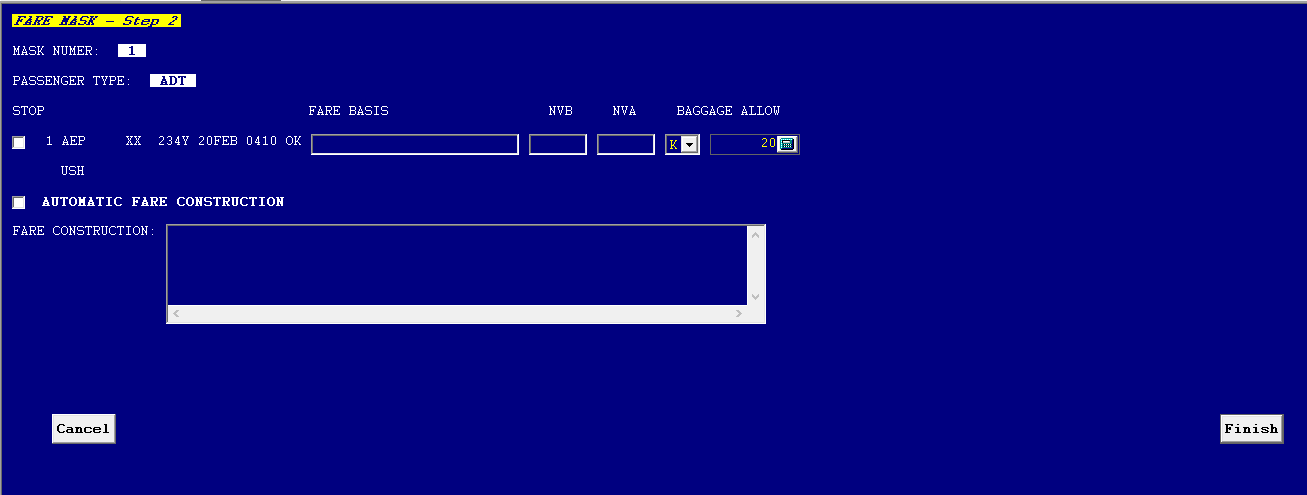
This screen is also completed with the necessary data and once finished, press the Finish button.
The response displays the loaded data in the following way
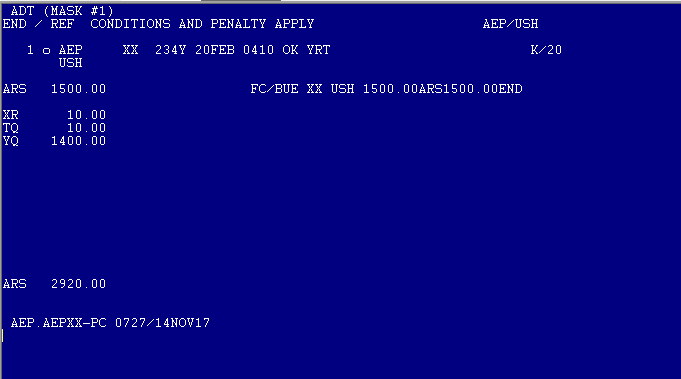
If the data is correct, the PNR must be recorded with ER, if not, it can be ignored with I to start again
When recording the PNR with ER and then retrieving it will be possible to see a REMARKS field where the mask has been stored.
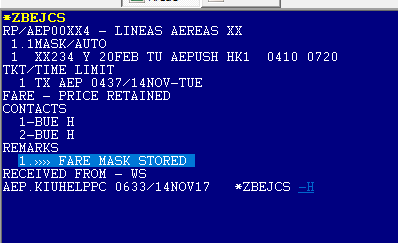
Once the mask has been recorded,you can proceed to ticketing .Up to nine masks can be loaded within the same PNR.
It is important to keep in mind that masks are created by passenger type. The command W * TKT creates by default an ADULT passenger mask, if you want to create some of CHD or INF, the commands would be
W*TKT*PCHD for Child
W*TKT*PINF for Infant
To view all the masks loaded inside a PNR, the command is:
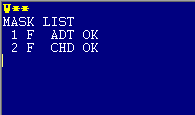
To see the details of Mask 1 you must enter W*1 ,W*2 according to the mask number.
Delete a Mask
The masks have a validity of 30 days once loaded but can be erased manually in case it is necessary.
W*D
This command deletes the mask that is stored in the PNR. The correct answer is DONE
Closing the PNR will automatically delete the Remark field:
If there are 2 or more masks recorded in the PNR, they can be deleted individually or partially.
The command would be:
W*D1,3 Deletes mask 1 and 3
Ticketing overriding Currency
In case you want to create a ticketing mask with a currency different from the origin of the trip or the terminal, it is allowed to override the currency with the following commands
W * TKT / <CURRENCY
Example : W*TKT/EUR
To override currency and passenger type , the command is as follows:
W * TKT / P <PASSENGER TYPE > <CURRENCY>
Example: W * TKT / PCHD / EUR
Ticketing with Masks
Ticket issuance with mask is very similar to direct ticketing .The difference is that you must clarify what mask you want to issue, in addition to
passengers, in the case of having different passenger types.
As in the direct ticketing, the same forms of payment are used, applying them in the same way.It is essential to have the mask that will be used, loaded and recorded in the PNR.
Once the mask is created and recorded, the issuance of a ticket can be generated.
Taking as an example the following PNR, the input command for ticketing is:
WK*M1*FCA
| WK*M | Fixed ticketing entry |
| 1 | Mask number |
| * | Divider |
| F | Form of payment |
| CA | Cash |
System Response
When retrieveing the PNR, it will look like this:
Replacing ticket time limit , a ticket field is generated for each one issued with the number of the same, the last name / initial of the passenger and the date of issue. Tickets will be issued for the value that is loaded in the mask.
When executing the command, that data is recorded in the PNR as a transaction in the PNR history.
Ticketing with Exchange Form of Payment
The command to use an exchange payment method with an issued ticket with mask is:
WK * FEX * M1 * N1
| WK*FEX | Fixed Format |
| * | mandatory divider |
| M1 | Mask number 1 |
| * | mandadory divider |
| N1 | Passenger number 1 |
The procedure and the rest of the mask is completed in the same way as detailed in direct ticketing .It should be noted that the fare to be used in the issuance of the new e-ticket will be the value of the mask.
Print and Display an e-ticket
Print an e-ticket
Once the e-tickets have been issued, a copy can be printed for passenger control. The same will contain all the data related to the trip. See the following PNR as an example.
ITR/2
| ITR/ | Command |
| 2 | Item number |
You can print an e-ticket indicating the ticket number
ITR/9992100000151
| ITR/ | Fixed Command |
9992100000151 | Ticket Number |
You can also print the ticket displayed on screen
ITR/*
| ITR/ | Fixed Command |
* | Asterisk indicating the action to display ticket |
There is another entry to print an e-ticket
ETP/ticket number
or
ETP/Prints ticket displayed on screen
Send a ticket by email
There are several options to send an e-ticket receipt by email.
1.Indicating Item number from ticket field
ITR/item number+email address
Example
| ITR/ | Fixed command |
| 2 | Item number |
| - | hyphen |
| support@support.com | email address |
2.Indicating ticket number
ITR/9992100000151-support@support.com
3. Indicating item number from email contact in contact field with the PNR displayed on screen.
ITR/2-M2
| M | Email indicator |
| 2 | item number |
Note: if there is only one email in the contact field you can omit the item number.
4. Send email with PNR displayed on screen
ITR/*-support@support.com
| ITR/ | Fixed Command |
| * | Asterisk |
| - | Dividing hyphen |
| support@support.com | Email address |
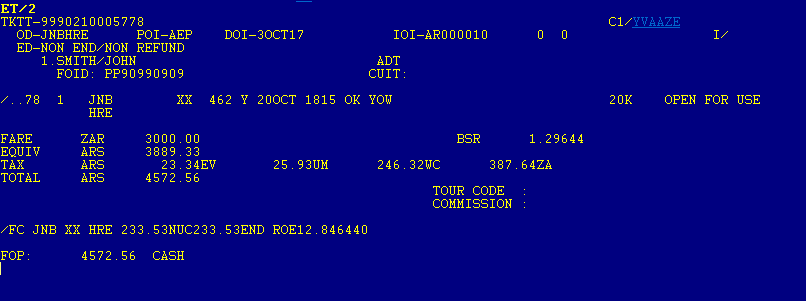
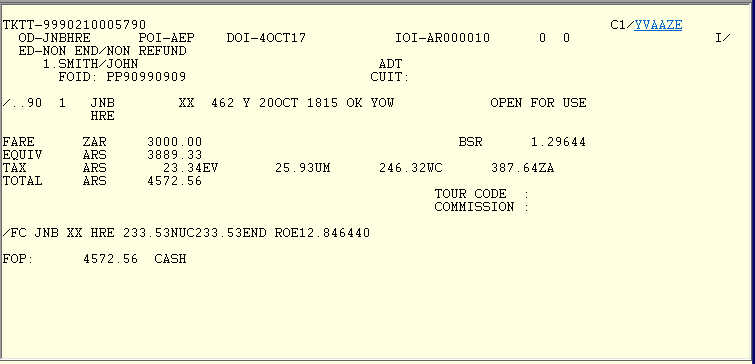
Display Ticket on Screen
The electronic ticket can be displayed on screen once issued. The entry command with the PNR also open.
ET/Item Number
Example
ET/2
| ET/ | Display command |
| 2 | Item number from the Ticket field |

If you do not have the PNR displayed on screen you can retrieve it with the ticket number
ET/9990210005918
Description
Ticket Number and PNR
| TKTT-9990210005918 C1/ZUBLBB |
|---|
Origin / Destination
| OD-AEPUSH |
|---|
Point of Issue
Date of Issue
POI-AEP DOI-15NOV17 |
|---|
IATA number
| IOI-55-49009-9 |
|---|
Endorsement Box
ED-END / REF CONDITIONS AND PENALTY APPLY |
|---|

Last Name ,First name,Passenger type,Segments,Flight number,Departure time,Free baggage allowance and Status.

Fare Construction Details,Taxes,BSR,Etc.
Another way to retrieve an electronic ticket on the screen is by doing: CONTROL + CLICK with the mouse over the ticket link.
* There is a way to visualize the ticket in a help screen without recovering it on the screen. The procedure to recover the ticket on that screen is by clicking with the mouse on the ticket link The help screen with the following format will open
This screen is independent of the work areas and serves to visualize the data of the ticket
Display a Purged Ticket
According to the criteria of the IATA resolution (Resolution 722f, Section 4 of the "Passenger" Manual Services Conference Resolutions Manual ") informs that the system (CRS / GDS) guarantee access to documents (tickets, MDPs and reimbursement notes) on-line for 13 months from the date of issue if there is at least 1 coupon left, with any of the following state:
- O OPEN FOR USE
- IRREGULAR TRANSACTION
- N NOTIFICATION
- G EXCHANGE/FIM
- L LIFTED/BOARDED
- S SUSPENDED
- U UNAVAILABLE
On the other hand, if the ticket has all the coupons with one of the states listed below, the Document must remain online for 7 days from the last date of use.
- F FLOWN
- P PRINT
- E EXCHANGED
- X PRINT EXCHANGE
- V VOIDED
- Z CLOSED
Note: The purged documents can be verified in the DATA EXPLORER Module
When searching for a , purged ticket from the reservation system, the system will respond the following message
TICKET NOT FOUND - ENTER THE FOLLOWING COMMAND TO CONSULT USING KIU DATA EXPLORER APPLICATION |
|---|
Below this message a command that must be entered will appear to check the ticket in the Data Explorer Module. The entry is the same as the one used to display a eticket from KIU but adding an asterisk at the end, as shown below.
| ET/9990210003489* |
|---|
When entering this command, a message stating LOAD APPLICATION will be read on the KIU screen and an internet browser will be prompted where you can view the information of the searched ticket and the history of it.
Display an e-ticket of another system on KIU screen
Displaying an electronic ticket issued in another system will be as follows and it will reflect the passenger's data, the flight number, the segments issued
in each coupon, class, travel date and check-in status (checked in or flown) corresponding to each coupon:
OPEN FOR USE
CHECKED
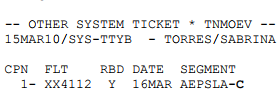
Indicator C at the end means checked-in
FLOWN

Indicator F at the end means Flown
View Ticket History
You can see the history of an electronic ticket having the PNR displayed with the following command:
ETH/2
| ETH/ | Fixed Command |
| 2 | Item Number |
Without the PNR displayed, the same command can be executed by replacing the item number by the ticket number.
ETH/9992100123654

CPN E-Ticket Coupon Number FRM/TO Origin/Destination FLT Flight Number CL Class DATE Departure Date ST Fight Status DEVICE Device Terminal where ticket was issued. SIGN User Sign TIME/DATE Time and Date ticket was issued OBSERVATION |
|---|
Redisplay E-Ticket on Screen
This command is used to redisplay an active electronic ticket in the work area, which has been previously retrieved.
ET*
To redisplay the history of an electronic ticket. The command is
ETH*
Ignore a displayed E-Ticket
This command is used to ignore an electronic ticket displayed in the work area. It is convenient to use it to not work on the e-ticket displayed by mistake or omission.
The command is:
ETI
Display an E-Ticket by Last Name
There is a way to retrieve an e-ticket by the passenger's last name.}
The command is:
*T/LASTNAME
This command will display a list of all the tickets you find with that name, withan access link to the e-ticket.
If there are more than 50 search results, the system will respond with the following error
TOO LONG - INSERT MORE DATA
To enter more information to the search you can enter the first name and dates of issue.
| *T/LASTNAME/FIRSTNAME | |
| *T/LASTNAME/FIRSTNAME/20DEC17 | Add issue date |
| *T/LASTNAME/20DEC17 | Only last name+issue date |
| *T/LASTNAME/FIRSTNAME/01JAN17-20MAR17 | Date Range |
Display an E-Ticket by Number
There is also a way to retrieve an e-ticket by its number.
The command is
*T/TICKET NUMBER
This command will display the requested ticket with an access link to it
Display an E-Ticket by document number
Another way to retrieve an e-ticket is by the passenger's document number. In this case you must bear in mind that you must have the same document added when ticket was issued.
*T/.DOCUMENT NUMBER
This command will display a list of all the tickets that you find with this document, with an access link to each of them. As in the previous points, you can use the same date options.
Print an Itinerary
In addition to printing the e-ticket, there is the possibility to only print the itinerary of the PNR.
The command is:
IE
This command prints the complete itinerary and of all the passengers of the PNR. To do this, the PNR must first be displayed on the screen.
You can print this information without having the PNR displayed. For this, the command is
IE/RESERVATION LOCATOR
There is also the possibility of filtering the information per passenger or per segment.
The command is:
IE*S1*P1
Description:
| IE | Fixed format |
| * | asterisk |
| S | Segment Indicator |
| 1 | Segment number to print |
| * | asterisk |
| P | Passenger Indicator |
| 1 | Passenger number to print |
Both indicators (segment or passenger) can be used individually.
Send an Itinerary by email
If you want to send an itinerary by email
IE-emailaddress@adress.com
Description
| IE | Fixed format |
| - | hyphen |
emailaddress@adress.com | email address to which itinerary will be sent |
You can also add an email in the PNR contact field and use it for sending.
Example
IE-M2
| M | Email indicator |
| 2 | Item number in contact field |
You can place the M indicator only in case there is a single mail contact. Passenger and segment filters can also be used for sending by mail.
Example
IE*S1*P2-emailaddress@mail.com
|
|---|
Void an E-Ticket
An electronic ticket can be canceled or voided provided that it meets the following conditions:
a) Personal Sales Report must be open
b) PNR associated to the ticket must be displayed.
c) Ticket must be within the Personal Sales Report active or in the current day.
d) The execution time of the command may not exceed the flight schedule, unless the user has the VOIDAL keyword to bypass this restriction
e) To perform the cancellation of a ticket remotely, the user must have the RPGSPV keyword.
Fulfilling the conditions mentioned, the entry command to cancel a ticket electronic is:
W*V9992100212135
| W* | Fixed command |
| V | Void indicator |
9992100212135 | Ticket number |
The system will return the following message.
W*V9990210005980
RE-ENTER FOLLOWING COMMAND TO PROCESS
W*V9990210005980/Y
To validate the cancellation of the ticket, you must execute the same command by adding / Y at the end .
Note 1
When a ticket that has been issued with EXCHANGE payment form is voided, the original e-ticket that was used in the Exchange will return to status OPEN FOR USE
Note 2
When a ticket that has been issued remotely is void , it will be settled in the sales report who issued it.
Void a Single Ticket within a PNR
When performing a VOID transaction , if the ticket to be voided is the only one in the PNR, the system places an automatic cancellation expiration of 10 minutes from the moment of execution of the cancellation command.
Example
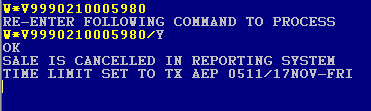
TX will display cancellation time
*A
RP/AEP00XX4 - LINEAS AEREAS XX
1.1MAR/AREL »PP90909909
1 XX203 Y 20FEB TU AEPCOR HK1 0725 0825
TKT/TIME LIMIT
1 TX AEP 0528/17NOV-FRI
FARE - PRICE RETAINED
CONTACTS
1-BUE H
RECEIVED FROM - X
AEP.KIUHELPPC 0758/17NOV17 *CNBEIG -H~006CNBEIG
E-Ticket Revalidation
Electronic tickets can be revalidated in case any of the following modifications:
1) Flight number.
2) Date of travel.
3) Scheduled time of departure or arrival.
The data that can not be modified to carry out the revalidation are:
1) Name of the passenger.
2) Class of service.
3) Route.
Revalidation functionality is to update the data when flight has suffered any change There must NOT be a difference in fare between the itinerary issued and the new itinerary.
Flight Coupon Revalidation
To carry out a flight coupon revalidation, the PNR in question must be displayed , No UN and / or TK segments are allowed ,so you must previously record the changes in order to proceed..Once this is completed, the command is executed:
ETRV/L2/S1/E1
Description
| ETRV | Fixed Command |
| / | Mandatory slash |
| L | Item indicator |
| 2 | Item number |
| / | Mandatory slash |
| S | Segment indicator |
| 1 | Segment number |
| / | Mandatory slash |
| E | Coupon indicator |
| 1 | Coupon Number |
Once the command is executed the ticket data is changed and recorded with the new information.The command is stored in the PNR history. Revalidated coupon will be shown as O (Open for Use) and the old coupon with a -(dash).which indicates cancelled due to a revalidation,
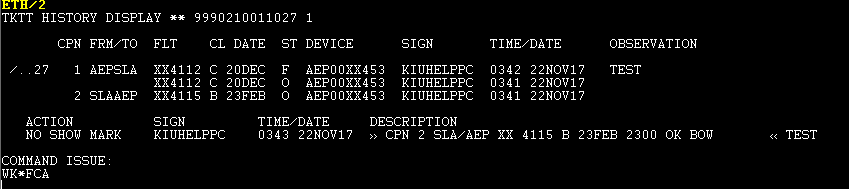
Several Flight Coupons Revalidation
Several segments can be revalidated at the same time. The format of the command is the same ,but you have to add the corresponding segments and coupons.
I
For example, to revalidate an e-ticket with segments 1 and 2 and coupons 1 and 2, the command is the following:;
ETRV/L2/S1,2/E1,2
Flight Coupon Revalidation with Observation
A revalidation can be made by adding an observation. The command is:
ETRV/L2/S1/E1/FREE TEXT
Example
| ETRV/L2/S1/E1/FLIGHT CANCELLATION |
|---|
In the e-ticket history it will look like this:
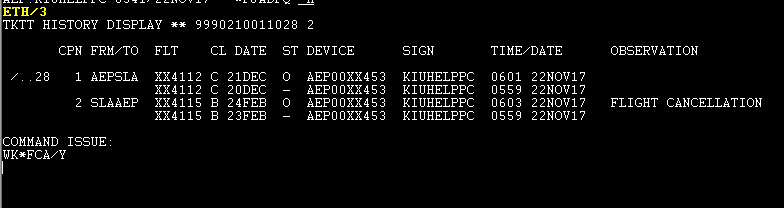
Note: observations may be added or not depending on the e-ticket server used for the ticketing.
Move E-tickets from a Purged PNR
This command allows you to move an e-ticket that belonged to a PNR already purged, to a new one PNR. This command will add the corresponding ticketing fields to the PNR, canceling the expiration or the manual ticket field. In addition there will be a change to the booking in the PNR history of the electronic ticket.
Considerations
- PNR displayed in the work area must be confirmed, priced and recorded in the pricing mask
- E-ticket that you want to move must be retrieved in the work area.
- E-ticket must have at least one Open For Use coupon.
- Last / First name of the e-ticket must match the Last / First name of the passenger of the PNR to which it will be associated (depending on the configuration made by the airline).
- Passenger type must also match.
- Booking code to which the e-ticket originally belonged must be purged.
Once the e-ticket has been moved to the new PNR, it is possible to carry out the revalidation or necessary changes. Although it is not necessary to move an e-ticket to make a exchange or a refund, it can also be done.
The command is:
ETMV/P1
| ETMV | Fixed command |
| / | Slash |
| P | Passenger indicator |
| 1 | Name item number within new PNR |
The positive answer is OK. It will modify the TKT / TIME LIMIT field with e-ticket data.
Example
TKT/TIME LIMIT TL AEP 1800/20NOV-SU E-ticket field BEFORE e-ticket move
|
|---|
TKT/TIME LIMIT 1 TKT/OK * 02NOV05/AEPXX-AA 2 TKT/ET 9992200000881 * 02NOV05/AEPXX-AA - HULY/F. E-ticket Field AFTER e-ticket move |
|---|
Date displayed on this field is the e-ticket move date.
PNR history will display it in the following format

In addition, the system may display the following warnings:
* AT LEAST ONE TICKET IS ISSUED When the passenger to whom you want to associate the ticket already has an e-ticket issued |
|---|
SEGMENTS DISCREPANCIES When the e-ticket to be associated has different segments than the PNR itinerary |
|---|
PRICE DISCREPANCIES When the fare amounts and e-ticket fares do not match the passenger type fare |
|---|
These warnings are general. To ignore these warnings and proceed to move the eticket, the command must be executed with / Y at the end (as in ticketing )
Agencies Electronic Accounts.
Electronic Accounts module allows agencies outside the BSP circuit and corporate clients to issue tickets. To be able to use this settlement mechanism travel agencies or the airline should not be members of the BSP.
Note:
The office codes can be verified with the DNO command
Example
DNOTRAVEL
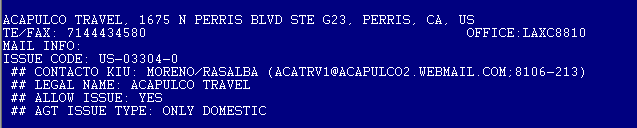
Display Electronic Account Listing
Display all electronic accounts that the agency has with the different airlines.
CTACTE*
Check an Electronic Account
CTACTEXX
CTACTE | Fixed Command |
XX | Carrier Code |
System displays the account statement. Tickets are detailed , as well as the commissions to be applied according to the type of issuance and the amounts granted by the airline as the issuance limit.
Statistical reports
This functionality allows travel agencies to generate statistical reports based on sales made.
These reports will break down sales information by:
- Carrier
- Form of payment
In order to generate these reports, the user must have Duty 1 in his signature (Administrator permission). These reports may be exported, for further analysis or archiving, and may also be printed.
Carrier
To query sales generated by an carrier the following command must be used:
TSA1/DATE
Example: TSA1/04MAR
| TSA1 | Fixed command |
| / | Slash |
| 04MAR | Date to verify |
When entering this command the system will open an auxiliary window and display sales made for each airline as shown below:

Considerations:
The report may be checked for date range as follows:
TSA1/DATE-DATE
Example: TSA1/03MAR-06MAR
In the previous example the report will display sales made by the agency by each airline between March 3 through 6th.The range cannot have more than 31 days and the since date cannot be more than 45 days from the current date.
Form of payment
To query sales made according to the form of payment used, you must enter the following command:
TSA5/DATE
Example: TSA5/04MAR
Description:
| TSA5 | Fixed command |
| / | Slash |
| 04MAR | Date to verify |
When entering this command the system will open an auxiliary window and display the sales made according to each payment method used at the time of sale, as shown below:
Considerations:
The report may be checked for the the date range as follows:
TSA5/DATE-DATE
Example: TSA5/03MAR-06MAR
In the previous example, the report will show the sales made by the agency in each form of payment, between the dates of March 3 to 6. The range entered may not contain more than 31 days and the "from" date may not be longer than 45 days from the current date.
Printing
The reports can be printed by adding the / PRINT indicator to the end of the command as shown below:
TSA1/DATE/PRINT
Example: TSA1/04MAR/PRINT
When making this entry, the system will open a print preview to indicate what you want to print. The / PRINT option applies to both the TSA1 report and the TSA5.
The / PRINT option applies to both the TSA1 report and the TSA5
Send to file
You can generate a file with the reports data by adding the -FILE indicator to the end of the command as shown below:
TSA1/DATE-FILE
Example: TSA1/04MAR-FILE
When making this entry the system will respond with the PC location where you saved the file.
Example:
DONE - FILE C:\RESERVAS\MYFILES\GENERAL_SALES_REPORT_04MAR2010_04MAR2010.CSV
-FILE option applies to both the TSA1 report and the TSA5. The file extension is .CSV (Comma Separated Value).
No Graph extension
At the moment of generating the report, it may be indicated that the pop up is not displayed, where the report information is displayed in a graphic.
In order not to display the graph when generating the report, the / NG indicator must be added to the end of the command as shown below:
TSA1/DATE/NG
Example: TSA1 / 04MAR / NG
The / NG option applies to both the TSA1 report and the TSA5.
Control Center
Description
The Control Center module will allow the travel agency user to have access to the following features:
Administration of Users and Devices
- Users: email entry, general information and clearance of duties (ticketing and / or electronic accounts and sales reports of the head office and branches of an agency)
- Devices: reset and deactivate
Access
To access the Control Center module for the first time, user 1000 must be registered and enabled in KIU System.
Registration
To register and enable user 1000, the user's e-mail address must be configured.
Email configuration
To configure the user's 1000 e-mail, the following steps must be carried out:
1) Enter KIU - RES application with the SI1000
2) Enter MAIL command followed by the email address to configure.
Example: MAILCOUNTER@KIUSYS.COM
The system will respond with the following message.
OK, DATA SEND TO SOPORTE@KIUSYS.COM
The system will automatically send a response with the confirmation for the validation of the data entered by the user to the KIU Support department. Once the KIU System team verifies the authenticity of the data, it will forward the information to the mailbox configured by the user.
To enable the mail you must check the link that is displayed in the confirmation email.
To modify the email address configured, you must send an e-mail to the email address soporte@kiusys.com requesting the change.
Access Control Center application
The user must access Control Center application with Google Chrome , Explorer or Mozilla session, and then entering
http://apps.kiusys.com/control/
The system will display a screen with the information as shown below:

Login
On this screen you must enter the following data:
- Office: you must enter the office code (OFFICE ID) to which the user belongs.
Ex: BUEA7760
- Mail: you must enter the e-mail address validated for the user 1000.
- Password: you must enter as password the password of the user 1000
Example MASTER
When pressing the ENTER button, the system directs the user to the Main Menu as shown in the following image:
- From this main menu the Available Offices will be displayed so the administrator can manage users and terminals.
- In this list of offices, only those agencies that the head office can manage will appear.
- To be able to work on the users and / or devices of an agency, you must click on the office ID of the agency.
List of Offices
Available Offices
You must select the Office on which you want to work ,terminal and / or user on which you want to work .
- This screen will give the possibility to exit the application, by means of the EXIT button.
- If you want to narrow the search, you can enter the specific data in the "Search" field.
- When selecting one of the listed offices, the system will display a screen with the postal information of the office and the devices associated with it.
Offices
From this screen you can modify the following data related to the Office:
- Phone (Phone Number)
- E-Mail for sending documents (E-Mail)
- Business Hours
- General Information (General Information)
To record the changes made, click on the "Update" button. Below is the screen where the mentioned data can be configured:
History
For each modification made, the system will leave a record in the history. The "History" button must be checked in order to display it.
In the first column, Date, Zulu Time and User who made the modifications will be displayed. The chronological order will be shown in descending order. In the second column the Description of the field to be modified will be displayed + FROM + Value without modifying + TO + Modified value.
Available Options
From this list you must select from the available devices, for the selected agency, or the list of users for that agency.
- List of Devices
- List of Users
List of Devices
In this option a list of all installed and free devices in the selected office will be displayed.
In the "Installed Devices" column, the devices already installed will be displayed, and in the "Free Devices" column the available ones to install will be displayed.
In case of having devices with no activity for more than 45 days, a section called "Installed Devices Without Activity (last 45 days)" will appear. From there you can select the terminal that is installed and unused, and reset it to be able to reinstall it in a new computer.
When ticking on one of the installed devices, the system will display the screen where the following transactions can be made:
Reference: in this field you can enter in free text format of the position or the user of the machine as a reference to facilitate its location.
To confirm the information entered or modified, press the "Update" button and the system will respond: The device was updated
Reset Device: when ticking the "Reset Device" button the system will automatically reset the terminal and assign a new value for the B field.
The system will indicate that the transaction was successful with the following response message:
“The Device was Reset. The new Key of Authentification (Value B) is 17199”
Field B should be reset when:
- PC has been formatted.
- Terminal has been blocked
- Disabling a terminal
Note:
If a user is signed in any area (graphic or cryptic) of the terminal the system resetting process will not be processed and a warning message will be displayed the following:
"There is at least 1 user signed in the terminal, it was not possible to reset the terminal"
To check this in the terminal you can perform the command * S / {terminal}.
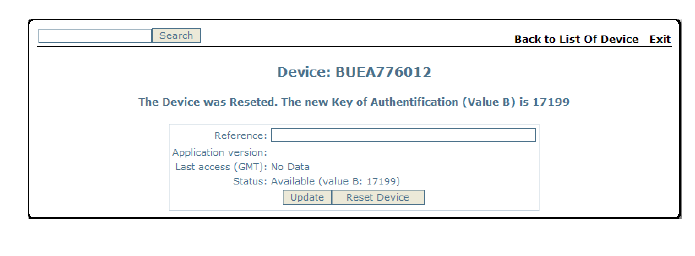
Free Devices (Devices Not Installed)
- In this option of the screen the system will list the enabled devices that have not yet been installed in the selected office.
- Next to the terminal identification, the value to be entered in Field B will be displayed.
- When ticking on one of the devices, the system will display the screen where transactions can be carried out on the field "Reference" and "Reset terminal"
List of users
A user must be selected .
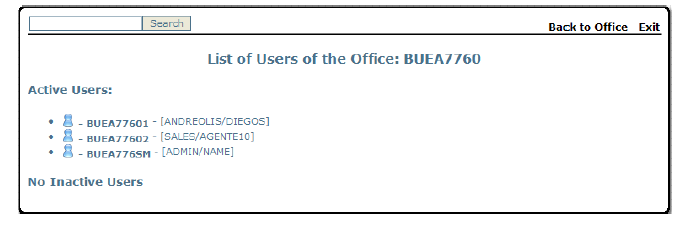
Active Users
In this list, all the active users of the selected office will be displayed. The system will identify it with the user code, as it will be registered when performing each of the transactions in the Kiu Res system; and in parentheses, the system will insert the user Last Name and Name.
To display a specific user data you should check the code.
Inactive Users
In this list all the inactive users of the selected office will be displayed. The system will identify them with the user code, as it will be recorded when performing each of the transactions in the Kiu - Res system; and in parentheses, the system will insert the User Last Name and Name. If there are no Inactive users, the message "No Inactive Users" will be displayed.
To display a particular user data , you should check the user code .When performing this action the system will display the following screen from which the modifications can be made
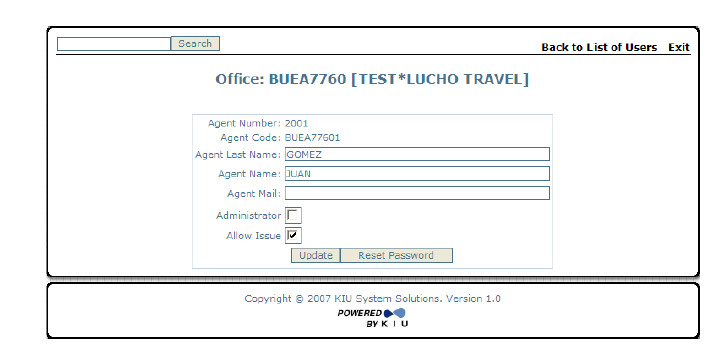
The user data that may be modified are:
- Last Name / Agent Name
- Agent's e-mail
- Enabling or disabling duty 1 (for electronic account inquiries or sales of the agency head office and branches)
- Enabling or disabling duty 4 (ticketing).
- When you click on the check box Administrator, Duty 1 is enabled for the user, who gives the administrator permission, this user can check the electronic account and the reports of all the agency's salespeople.
- Clicking on the Allow Issue check box enables Duty 4 for the user, which gives him permission to perform ticket sales.
- This screen will give the possibility of returning to the list of users or logging out of the application, by means of the "Back to List of Users" and "Exit" buttons, respectively.
E-Mail field considerations
- If a user has entered an e-mail address, the itinerary (IE) and e-ticket (ITR) vouchers, sent from KIU RES, will be sent to the passenger with their specified e-mail address.
- If the agency has an e-mail configured and the user does not, then the passengers will receive the itinerary vouchers and / or tickets in the agency-mail address.
- If the agency has configured an e-mail and the user also, then the passengers will receive the itinerary vouchers and / or tickets with the user's e-mail address.
- Once the changes are generated, you must click on "Update".
Password Reset
In order to reset the password of a user, you must click on the "Reset Password" button.
The new password is randomly generated by the system with 6 numbers.
The password must be reset when the user forgets his password or considers it necessary.
Likewise, the same user can modify the password, as many times as required, by signing on to the system using the SI (user number) command and entering the new password in the "New Password" box.
Reset Terminals and Users from www.kiusys.com
Travel Agencies can reset terminals (devices) or KIU devices, and passwords of users from the KIU website: http://www.kiusys.com/en/index This is an exclusive service for travel agencies.
To request the reset, the travel agency must enter www.kiusys.com/en/index and choose the AGENCIES option from the top menu:

When clicking on the agency option you will see another menu.

Operator Online Option to chat with our help desk support.
New Agency Option to request the creation of a new agency in KIU
Devoce Reset Option to reset a terminal and generate a new Field B
User Rest Option to request the reset of the password of one or more users
Download Option to download KIU for Windows,Connectivity verifier and the uninstaller.
To reset a terminal and / or the password of a user, the following data must be entered:
E-MAIL
The agency must enter the email address of the contact person with KIU.
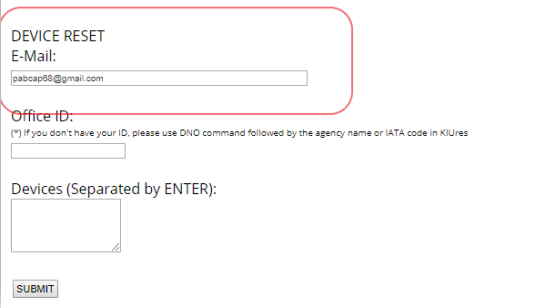
How to find KIU CONTACT email address.
If you have terminals available by entering the DNO command (name of the agency, office id or IATA) you can see the mail CONTACT KIU.
Otherwise the agency must contact our system support by mail requesting the email. If the entered mail is not correct, the system will inform on the screen the following message in
red :
There was an error. Please verify your data.
OFFICE ID
The agency office ID must be entered in KIU. This information is obtained when checking DNO command followed by the name of the agency or the IATA number.
The office ID always starts with the city code to which the agency belongs, followed by a letter and then 4 numbers. Example: BUEA7770
DEVICES
You must enter the devices you wish to reset for reinstallation. Several terminals can be requested for resetting in the same transaction. In this case they must be separated
with ENTER tab.
The terminals to install KIU are formed of the office ID and two additional numbers at the end.
Example: BUEA777001
The number of each terminal appears at the bottom of the KIU screen in the lower menu; or it can be checked by performing the * S * command in the system. Once this command has been made, the information will be displayed in the field called DEVICE.
Travel agencies can check all the terminals assigned from the Web Module called Control Center. If any of the data entered is not correct, the system will inform on the screen the following message in red:
There was an error in your request. Please verify the data
Se deben ingresar los usuarios a los cuales se les desea resetear la contraseña.
Se pueden solicitar varios usuarios de manera conjunta para su reseteo. En este caso los mismos debe separarse con ENTER.
USERS
You must enter the users that need their password to be reset.Multiple users can be requested together for their reset. In this case they must be separated with ENTER.
Travel agencies have two types of original users: the number 1000 (which has an administrator profile); and then users for reservations and sales that start from the number 2001 and follow correlatives according to the quantity requested. Example: 2001, 2002, etc.
Once entered the required data and the terminals or users to be reset, you must click on the SEND button.
When performing this action, the following message will be displayed on the screen.

CONFIRMATION EMAIL
After sending the request for resetting terminals or users, an email will be sent to the email address, informed on the web page form, requesting the request confirmation.
The subject of the mail will be addressed to the agency name followed by the text: KIU Terminal Reset Request. Example: TRAVEL AGENCY - KIU Terminal Reset Request
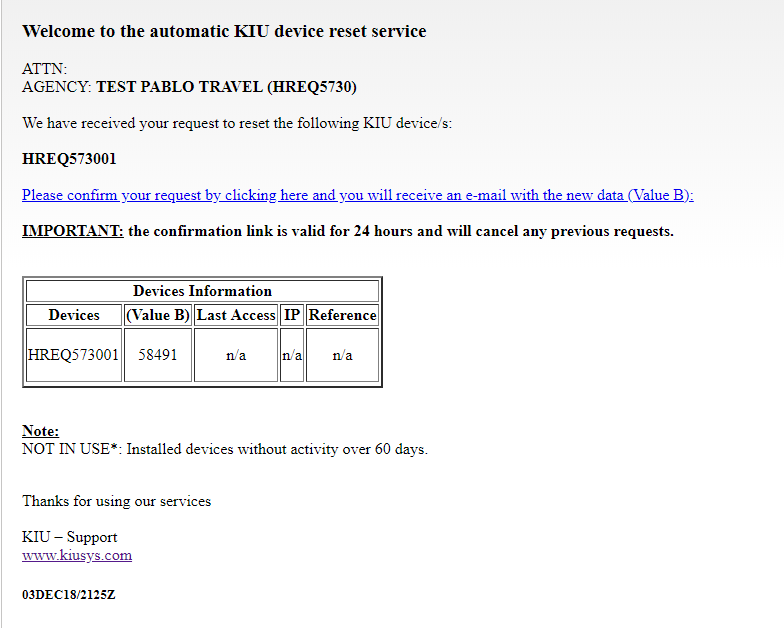
In this email a table will also be displayed with the terminals assigned to the agency. The terminals installed, the ones not installed (if any) and the installed terminals that are not active for more than 60 days will have a note so they can be easily identified.
In the case of terminals not installed, Field B available for installation will be informed.
For the installed terminals, the last access to it will be informed; the IP where it is located; and the reference if it was indicated at the time of installation or from the Control Center Module.
With these data the user can confirm or not the reset request of the terminals indicated. If you decide to confirm the request you must click on the link indicated in the e-mail.
When doing this last action, the following message will be displayed:
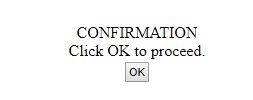
When you click on the ACCEPT button, the system will display the message: "Request completed." And a new e-mail will be sent with the data reset, as shown below:
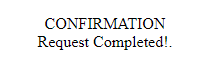

The subject of the mail will mention the agency name followed by the text KIU Terminated Terminals. Example: TRAVEL AGENCY - KIU Terminals Reset
if the request is for user password reset , the subject of the email will be as follows: TRAVEL AGENCY - KIU User reset
In the mail body the new information will be displayed as follows: